Meshnology N37 Wio Tracker L1
1. Overview
- Product: Meshnology N37 - Seeed Wio Tracker L1 LoRa Meshtastic GPS Development Board, equipped with a 1.3″ OLED display.
- Positioning: Used for Meshtastic nodes, LoRa Mesh networks, GPS tracking, IoT prototyping, etc.
- Features: Pre-installed with Meshtastic firmware, easy to use out of the box, supports multiple power supply methods (USB-C, solar power, Li-ion battery), compatible with Grove extensions.
1.1 Product Description
- Main functions
- Integrated Nordic nRF52840 MCU (64 MHz)
- LoRa SX1262 Wireless Module (862‑930 MHz)
- High-precision GNSS Module (GPS, BeiDou, GLONASS, QZSS)
- OLED Display (1.3″ 128×64)
- Bluetooth 5.0 Support
- Grove Interface, Debug SWD Pins
1.2 Specifications
| Parameter Category | Details |
|---|---|
| MCU | Nordic nRF52840 ARM Cortex‑M4 |
| Flash / RAM | 1 MB Flash, 256 KB RAM |
| LoRa | Wio‑SX1262, 862‑930 MHz |
| GNSS | L76K (GPS/BeiDou/GLONASS/QZSS) |
| Display | 1.3″ OLED 128×64 |
| Interface | Grove, UART/I2C/GPIO, SWD |
| Power Supply | USB‑C, Solar 5 V/1 A, Li‑ion 3.7 V |
| Certifications | FCC, CE, RoHS |
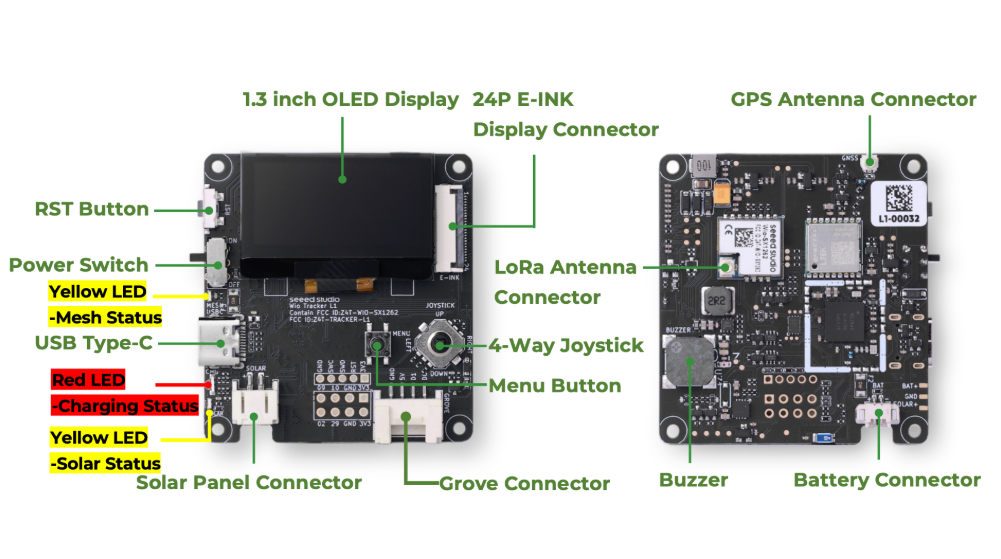
2. Hardware Details
2.1 Pin description

2.2 Grove and peripheral expansion
The usage method of the Grove interface and the list of pluggable sensors.
You can add sensors to the device through the Grove interface. The following sensors have been verified to be compatible with the Grove interface on the device.
| Sensor Type | Sensor Model | |
|---|---|---|
| Environmental sensor | Pressure | BMP085 |
| Temperature | MCP9808、PCT2075 | |
| Temperature and humidity | SHT31 /SHTC3 / SHT4X、AHT10 | |
| Temperature,humidity, and air pressure | BME280 | |
| Other | Heart rate and blood oxygen saturation | MAX30102 |
| I2C keyborad | CardKB |
3. Getting Started
3.1 Packing List
-
Wio Tracker L1 System Board
-
LoRa antenna
-
GPS module
-
3000 mAh battery
-
N37 3D shell
3.2 First Use(Basic Steps)
Note: When the device displays the following status, please do not manually restart or shut down the device. Otherwise, the device may be damaged.
- Message transmission process is not completed
- In the process of configuration
Flash firmware
Please don't use NRF-OTA to update the firmware, as it may cause the device to completely fail to start.
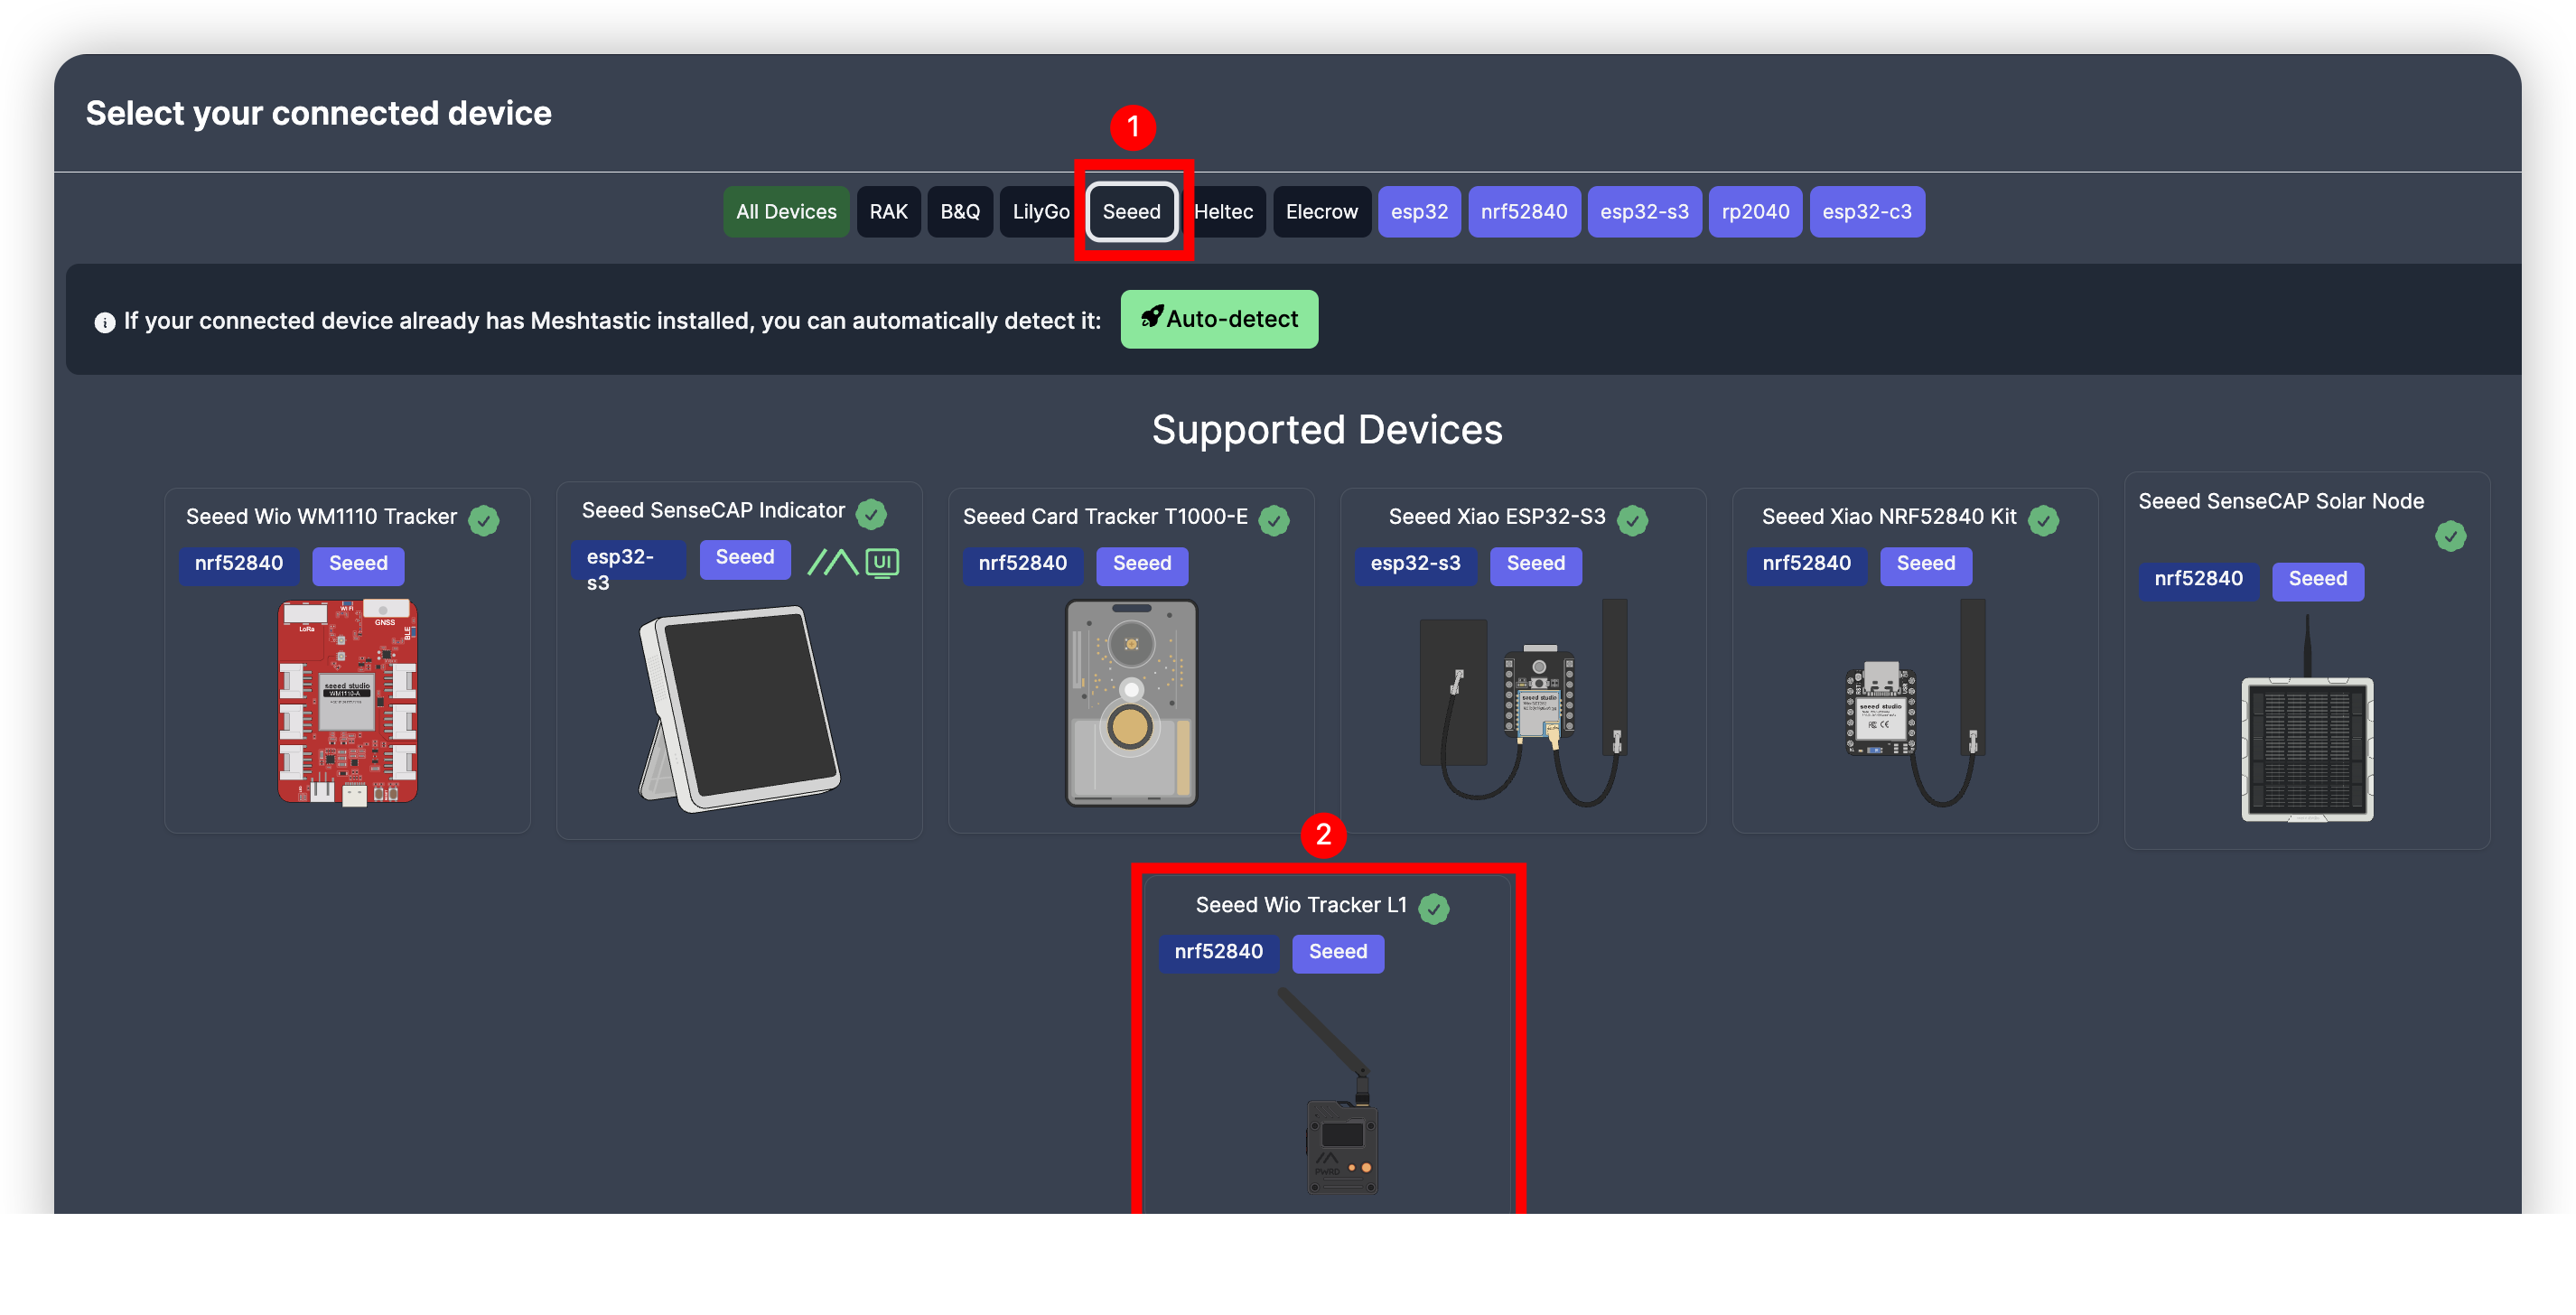
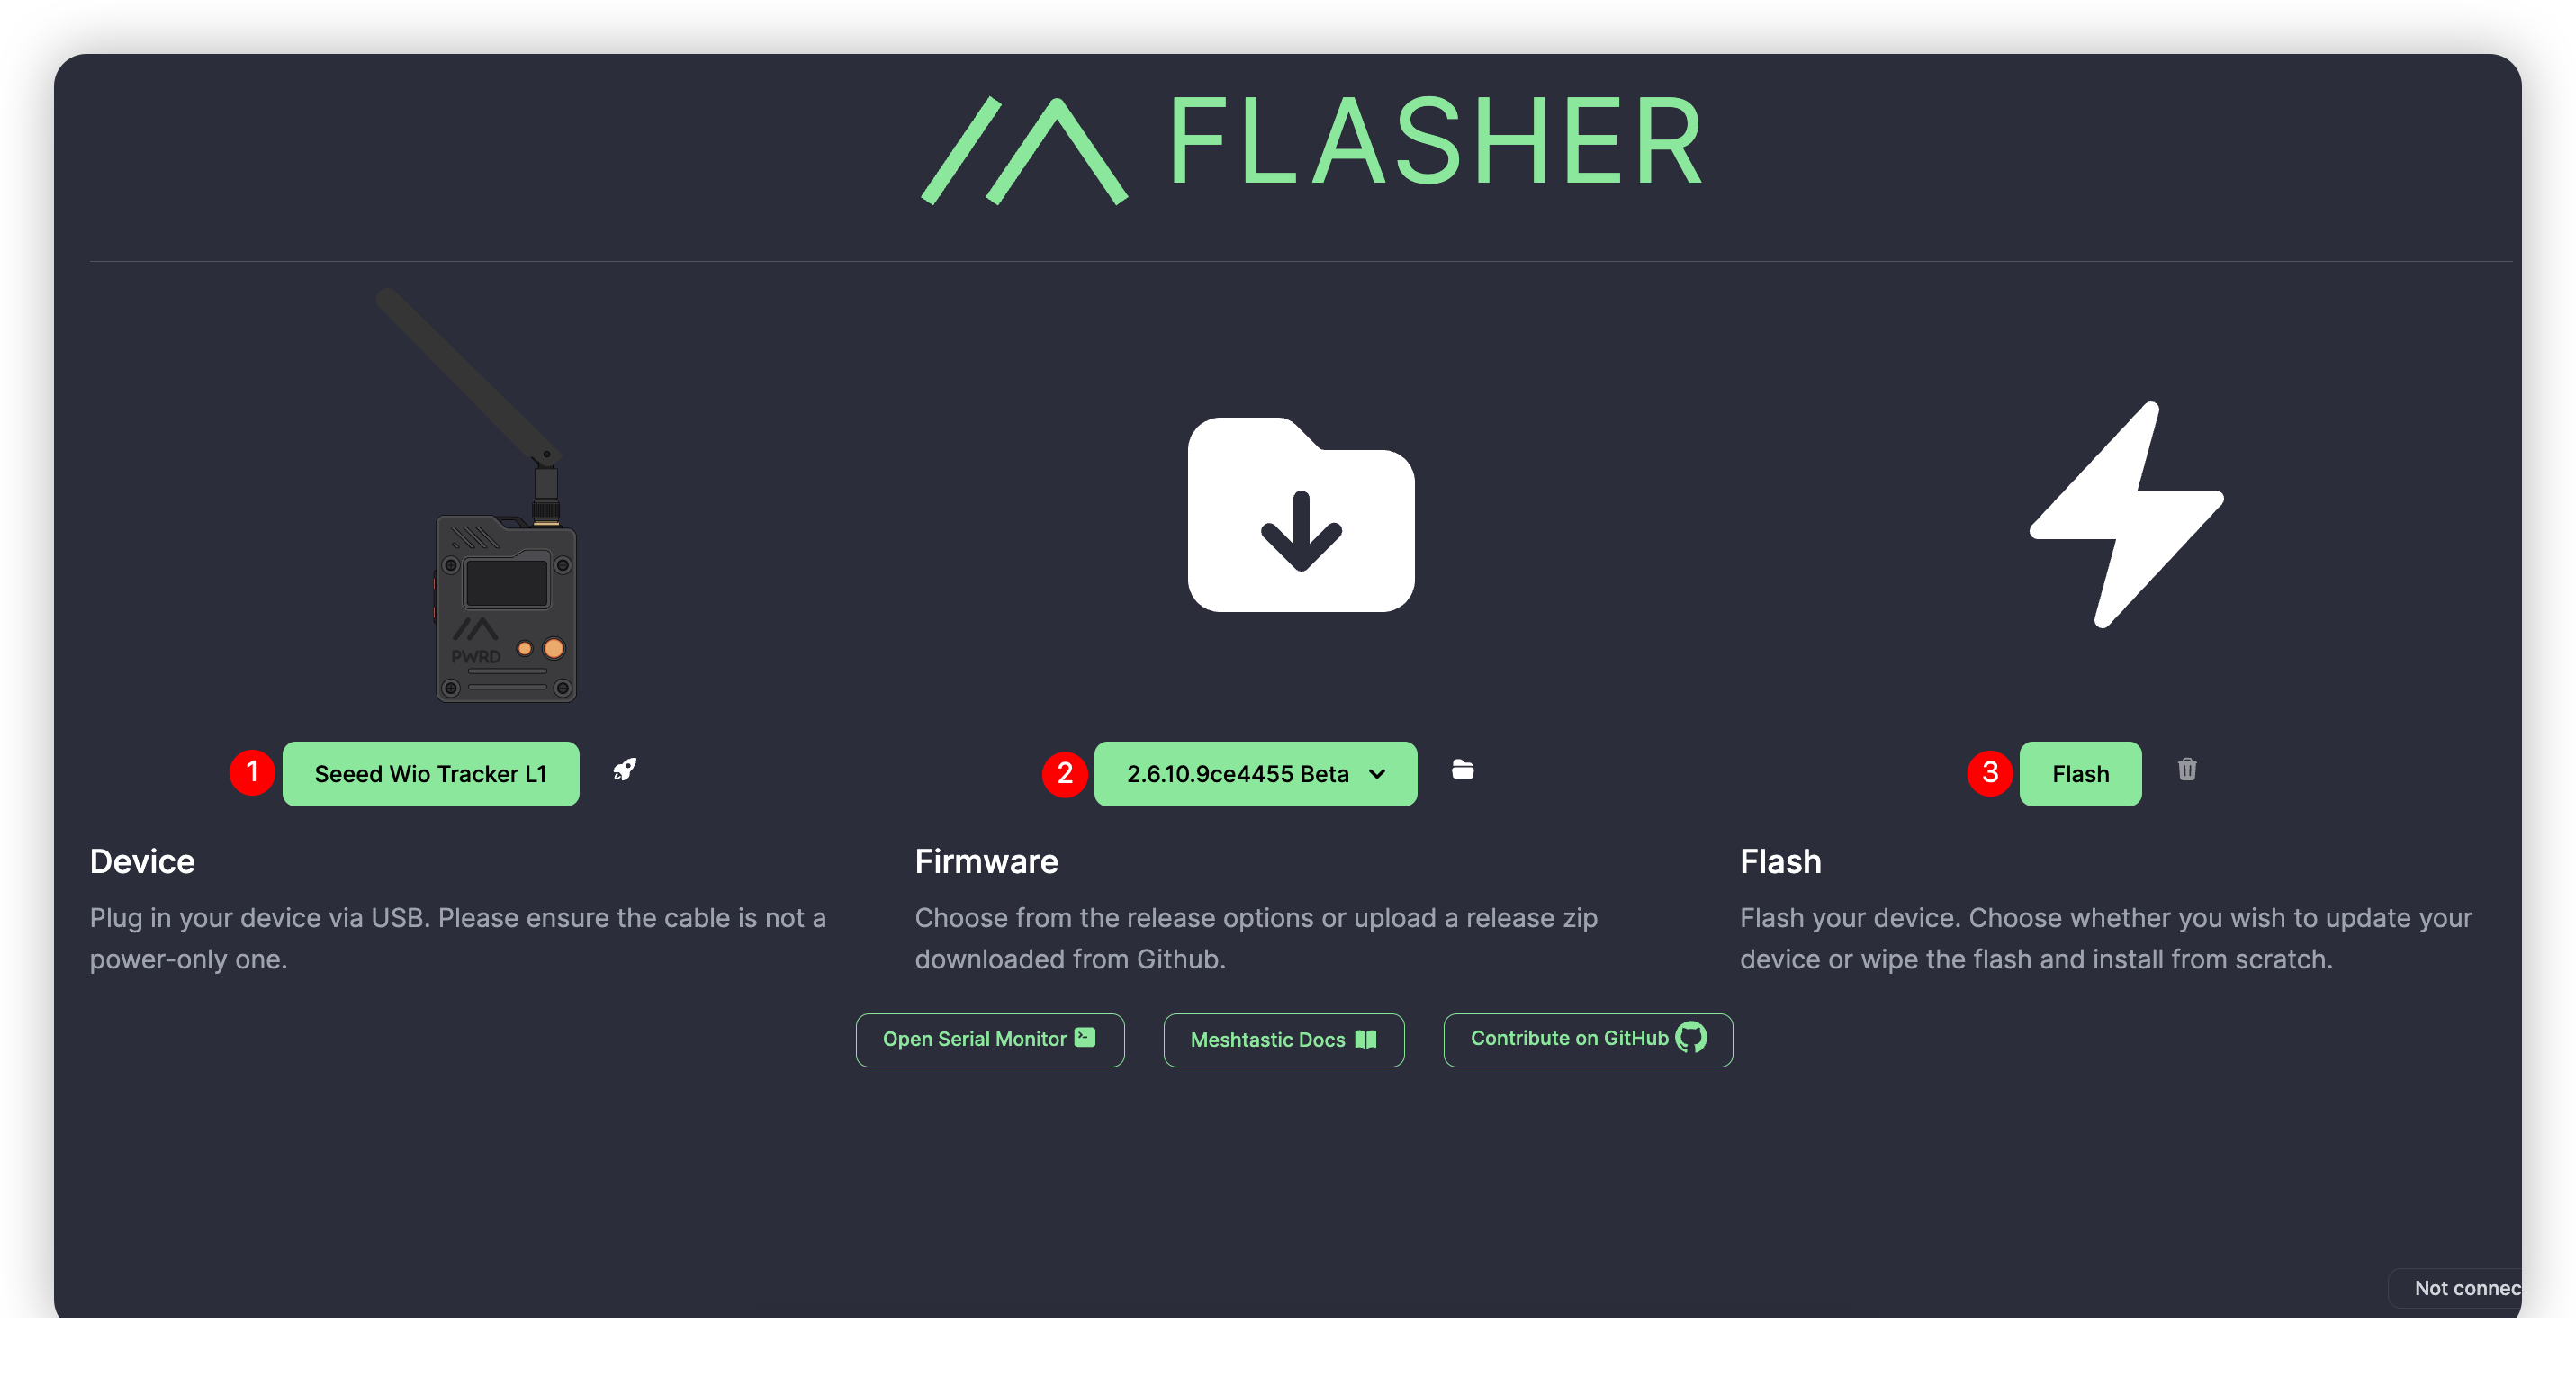
Visit Meshtastic Web Flasher.
For L1, L1 Lite, and L1 Pro, select the target device as Seeed Wio Tracker L1 and choose the latest firmware, then click Flash.
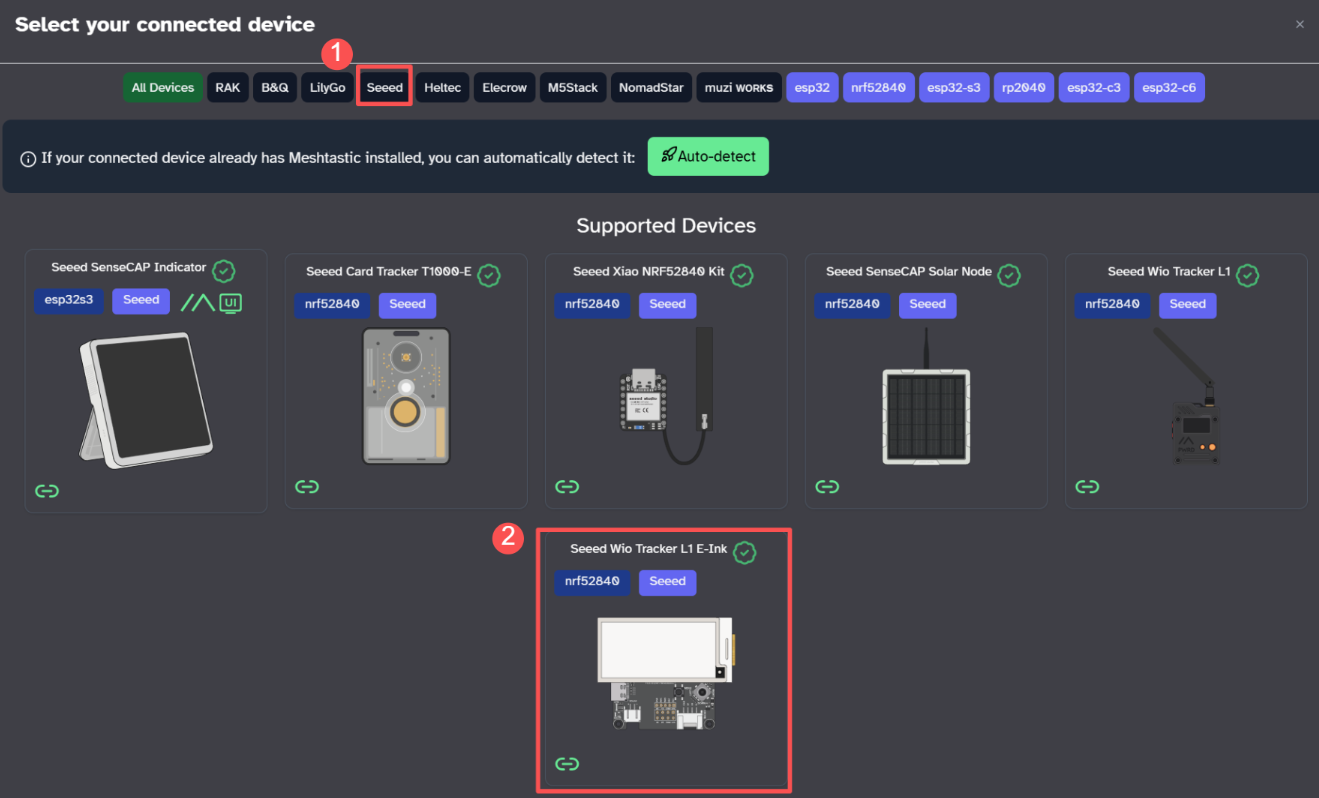
For L1 E-Ink, select the target device as Seeed Wio Tracker L1 E-Ink and choose the latest firmware, then click Flash.

Open it, click Enter DFU Mode, and a device named Tracker L1 will appear. Click on it and connect to it. A drive named Tracker L1 should be displayed.
Drag the UF2 file to the DFU drive. After the file download is complete, the firmware should be flashed, and the device will restart.
3.3 Connect Meshtastic App
Start
Connect the USB cable to activate the device. Flick the power switch upwards to turn it on.
❗Prompt
If the device does not respond when you press the button, please charge it first. Do not use a fast-charging charger.
Through application
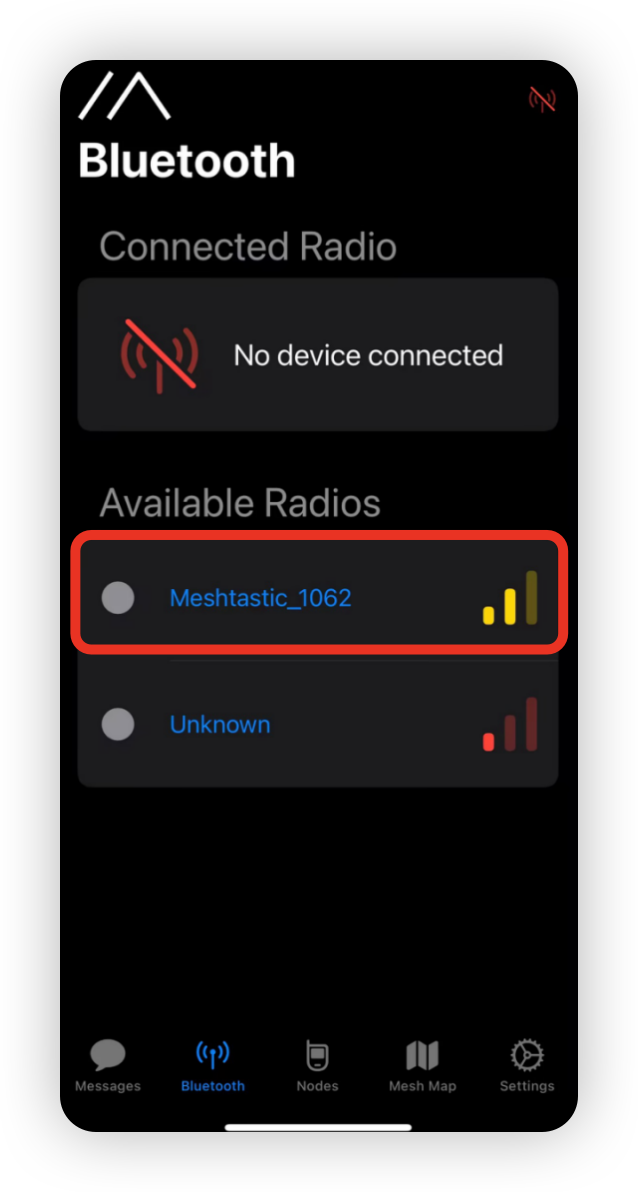
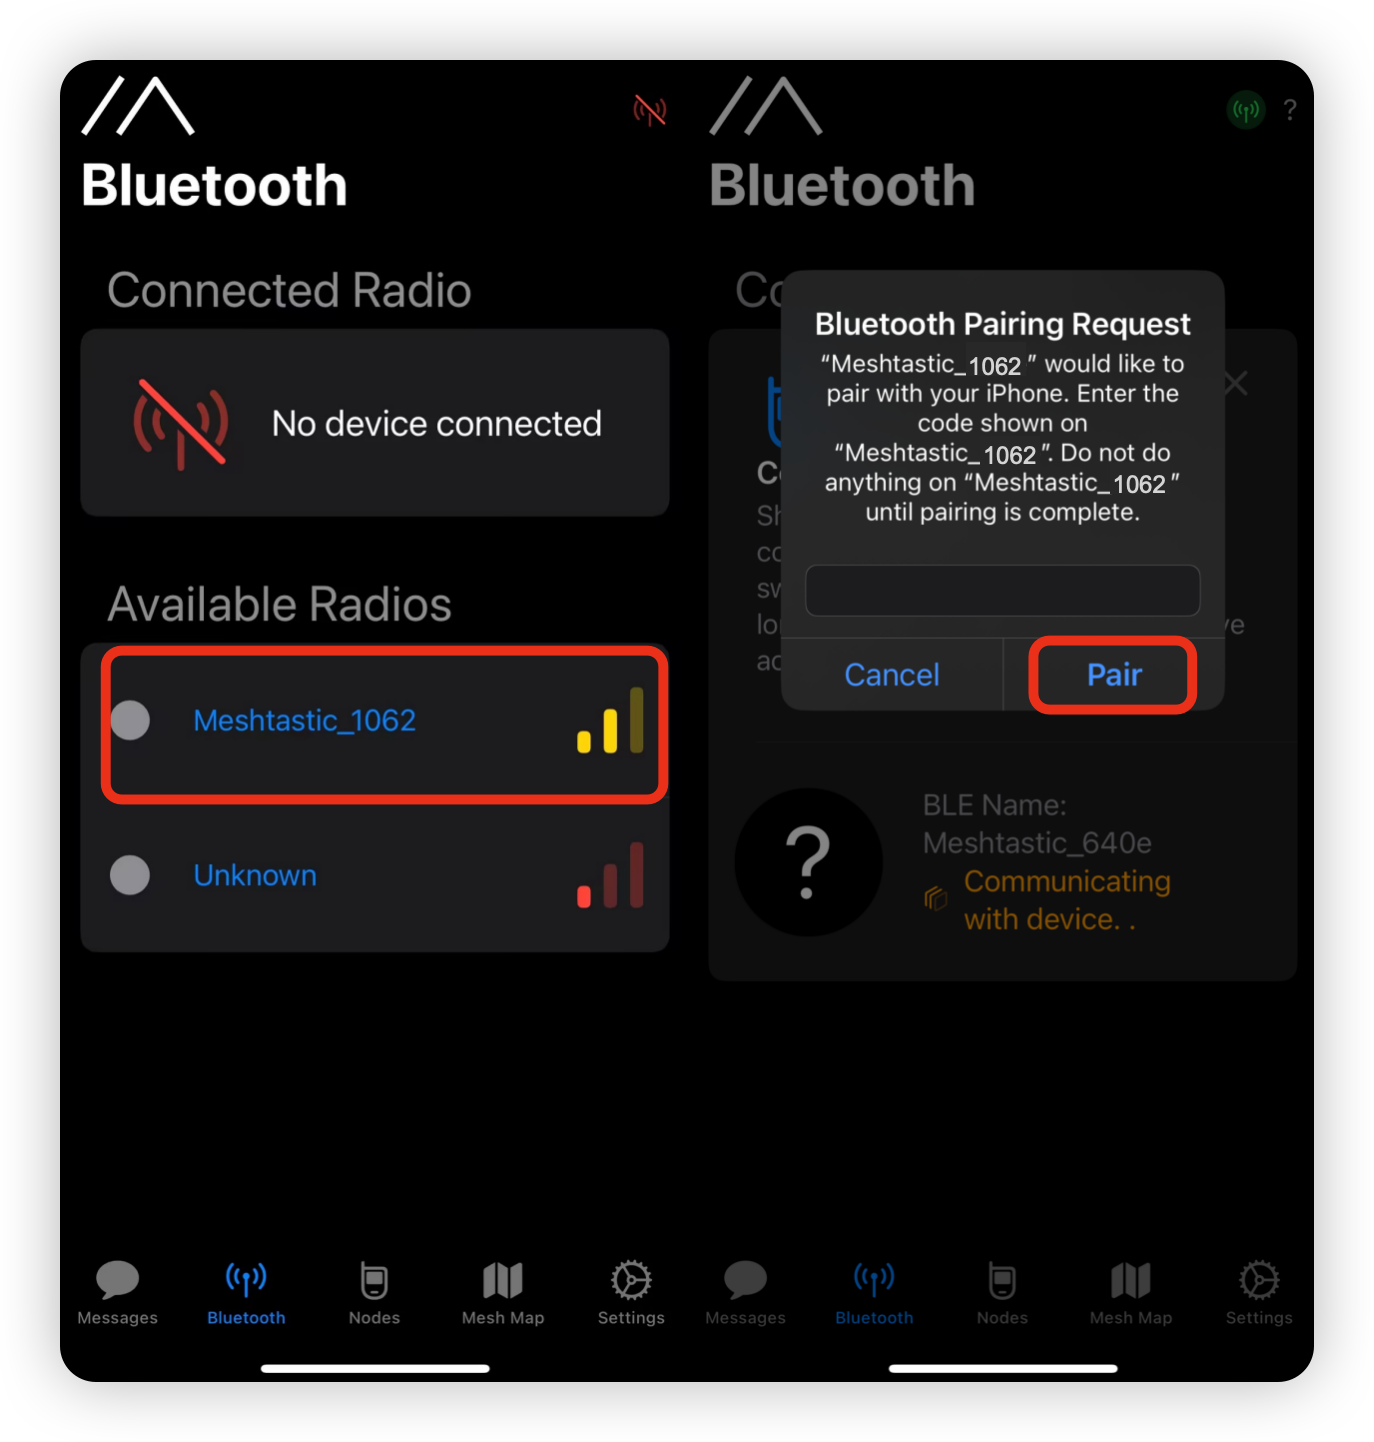
iOS application
- Select the target device on the Bluetooth panel.
- Input the code displayed on the screen, and then click
OKto connect the device.
-
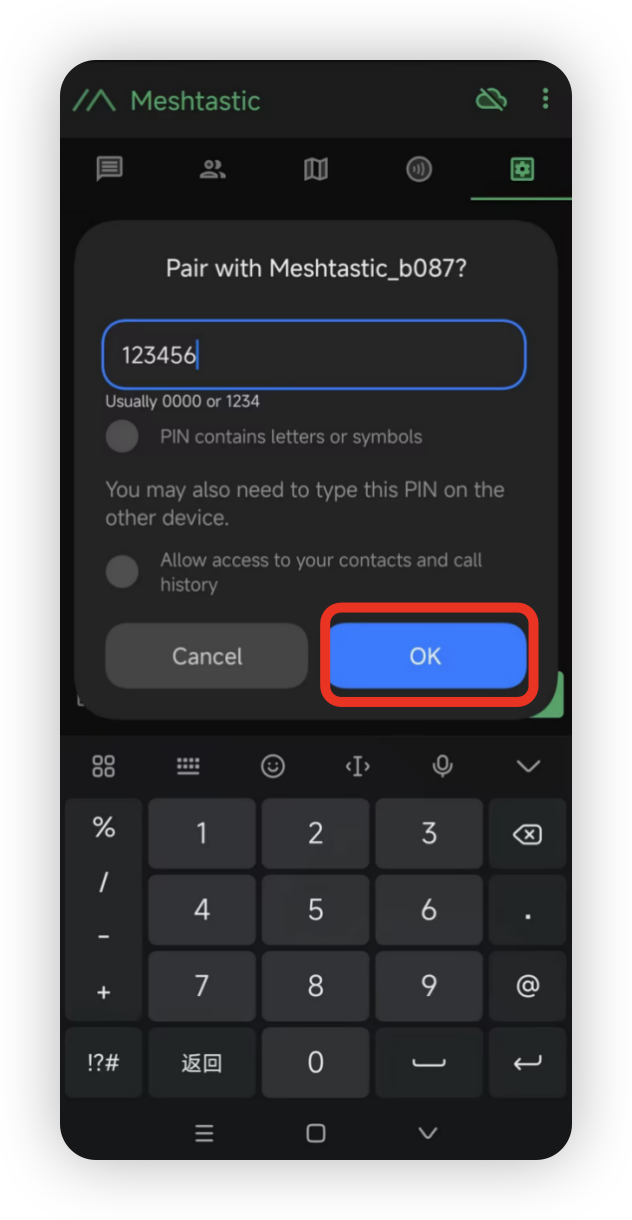
Android app
-
Click
+and select the target device.

- Input the code (the default code is
123456), and then clickOKto connect the device.
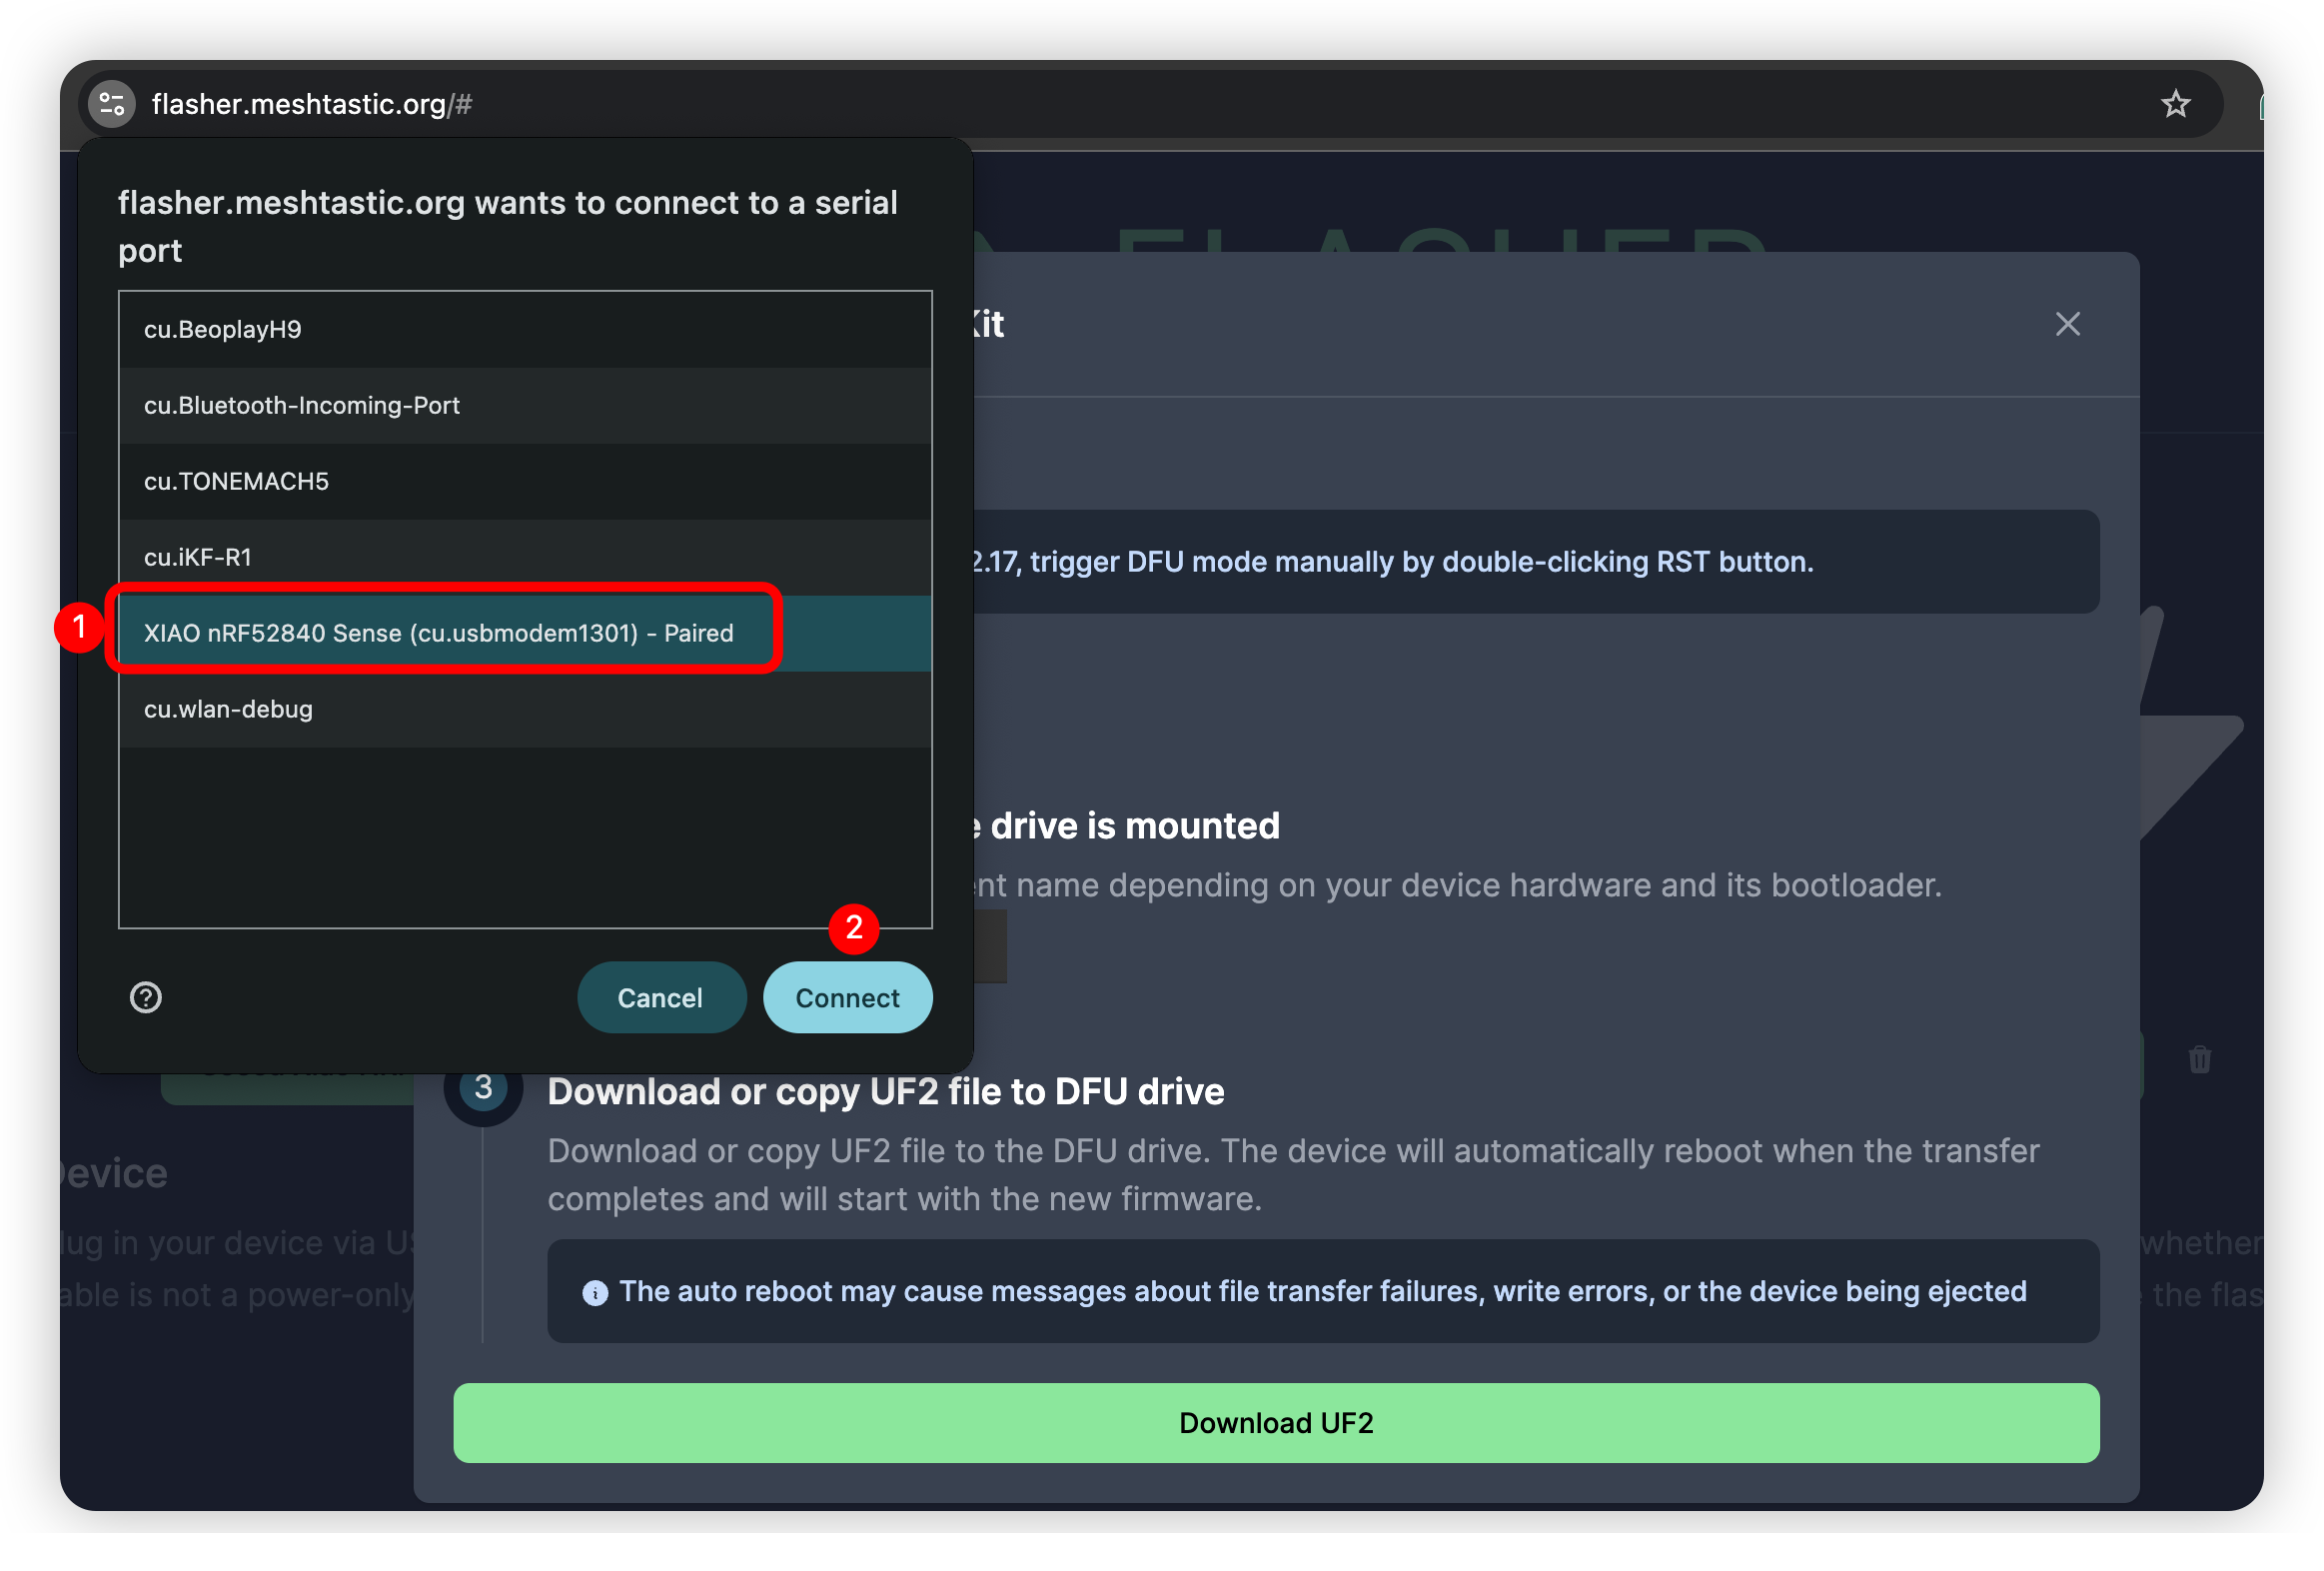
Through the website
If you wish to send text messages and communicate with other nodes on the website, you can now connect your device to the Meshtastic website.
Step 1: Open the website
clickGo to this website.
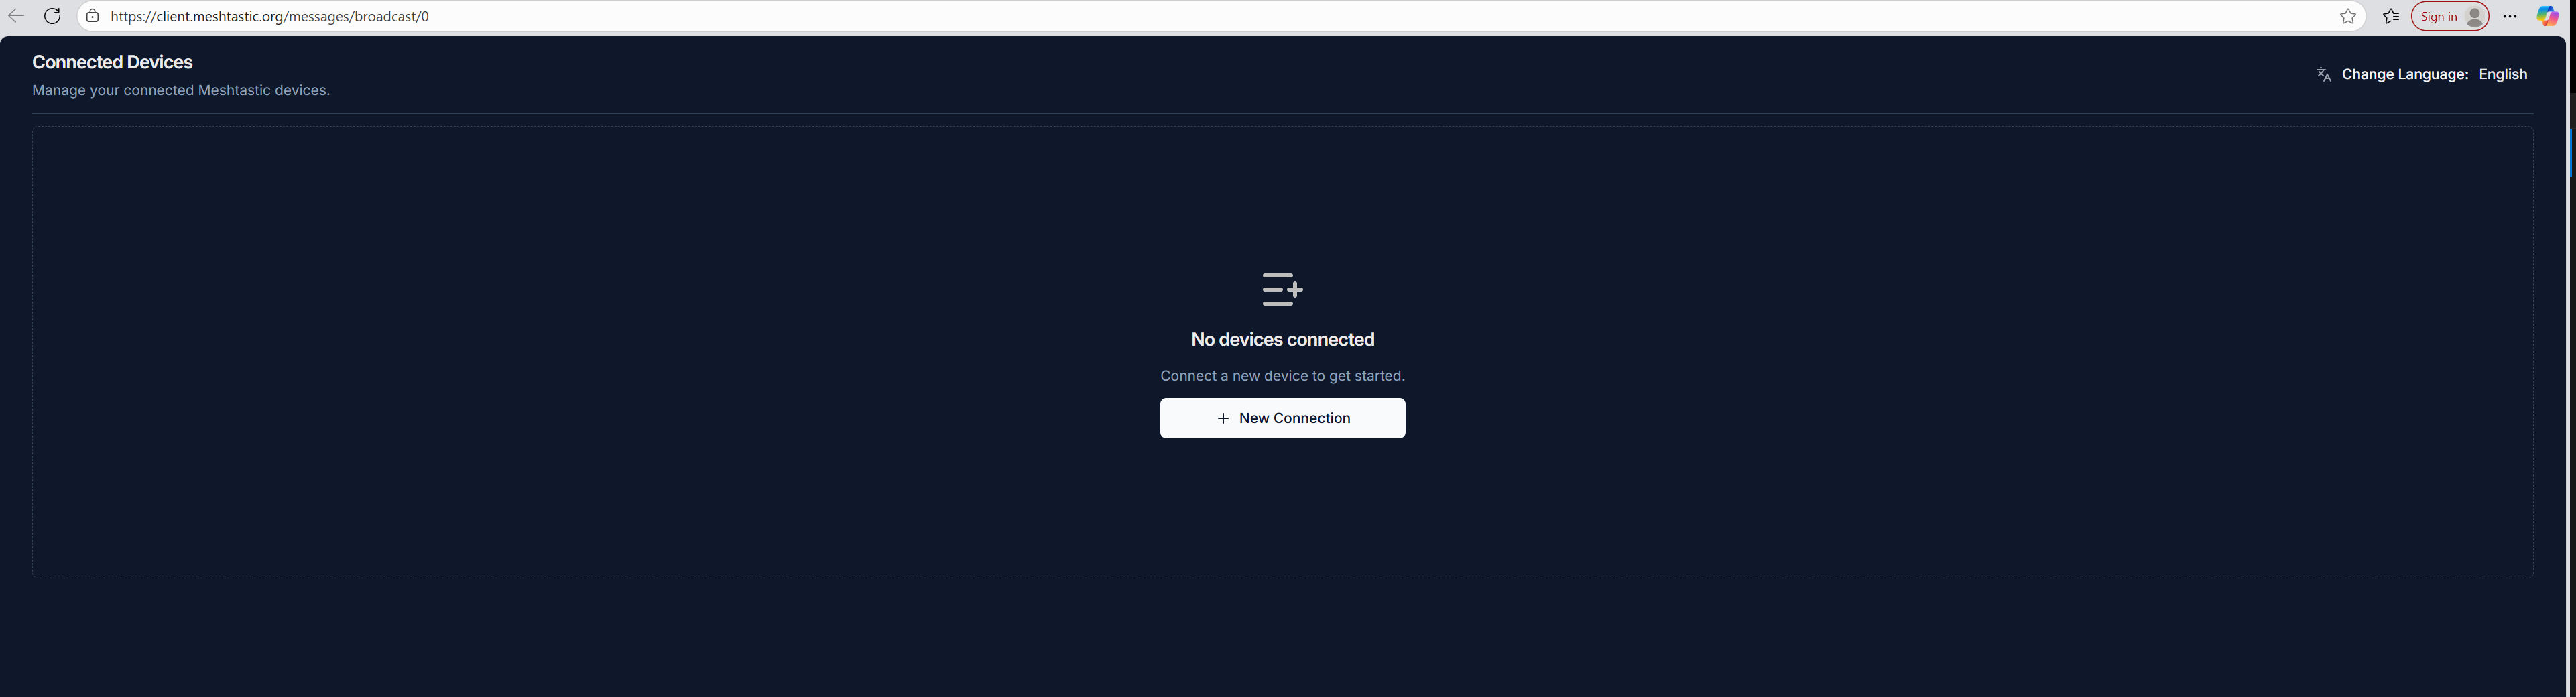
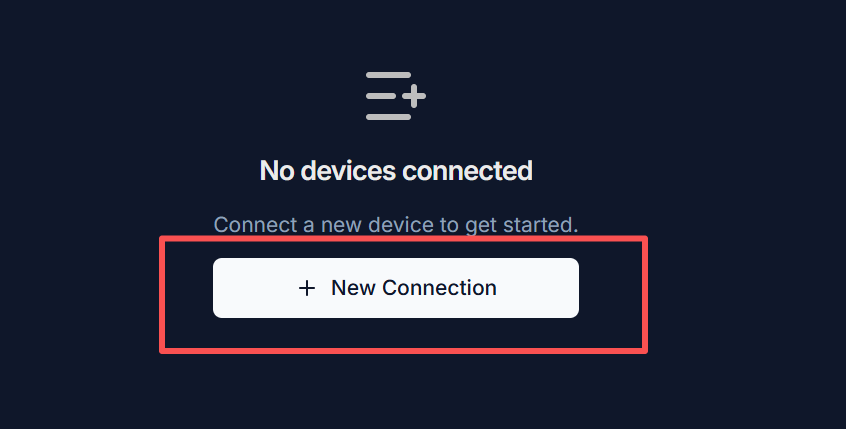
Step 2: Add a new device
Click "+ New Connection".
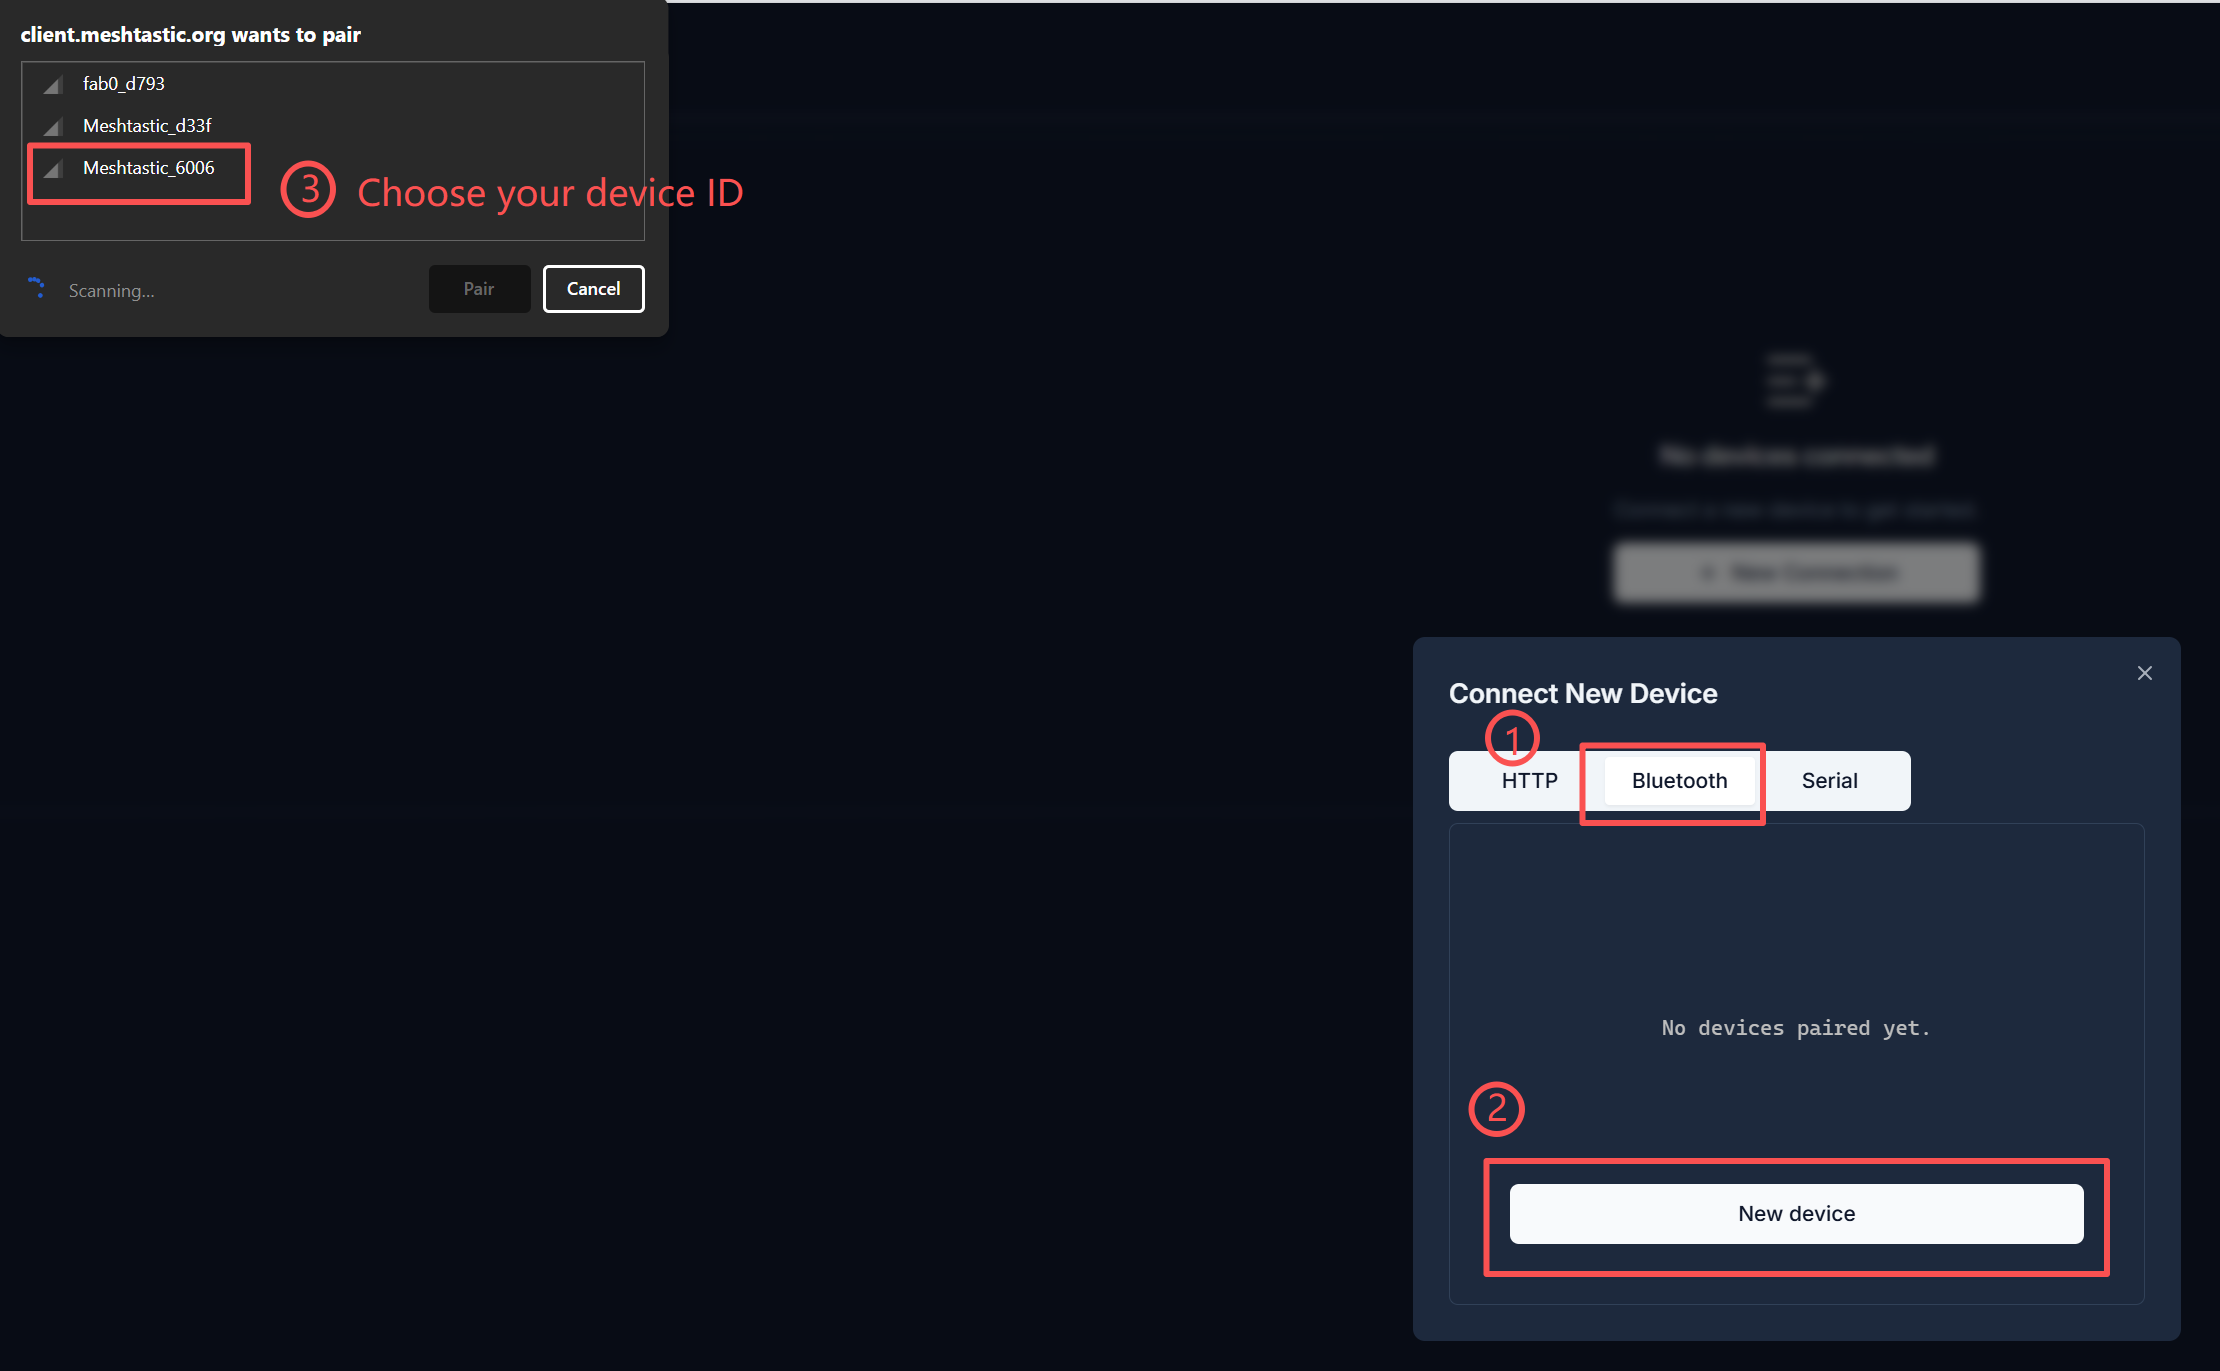
There are two connection methods. You can choose the one you prefer.
Method 1: Via Bluetooth
Select the Bluetooth method. Choose the device ID in the pop-up window.
Method 2: Through serial port
Select the serial port mode. Open the Device Manager to check which port the device is connected to. Select that port in the pop-up window.
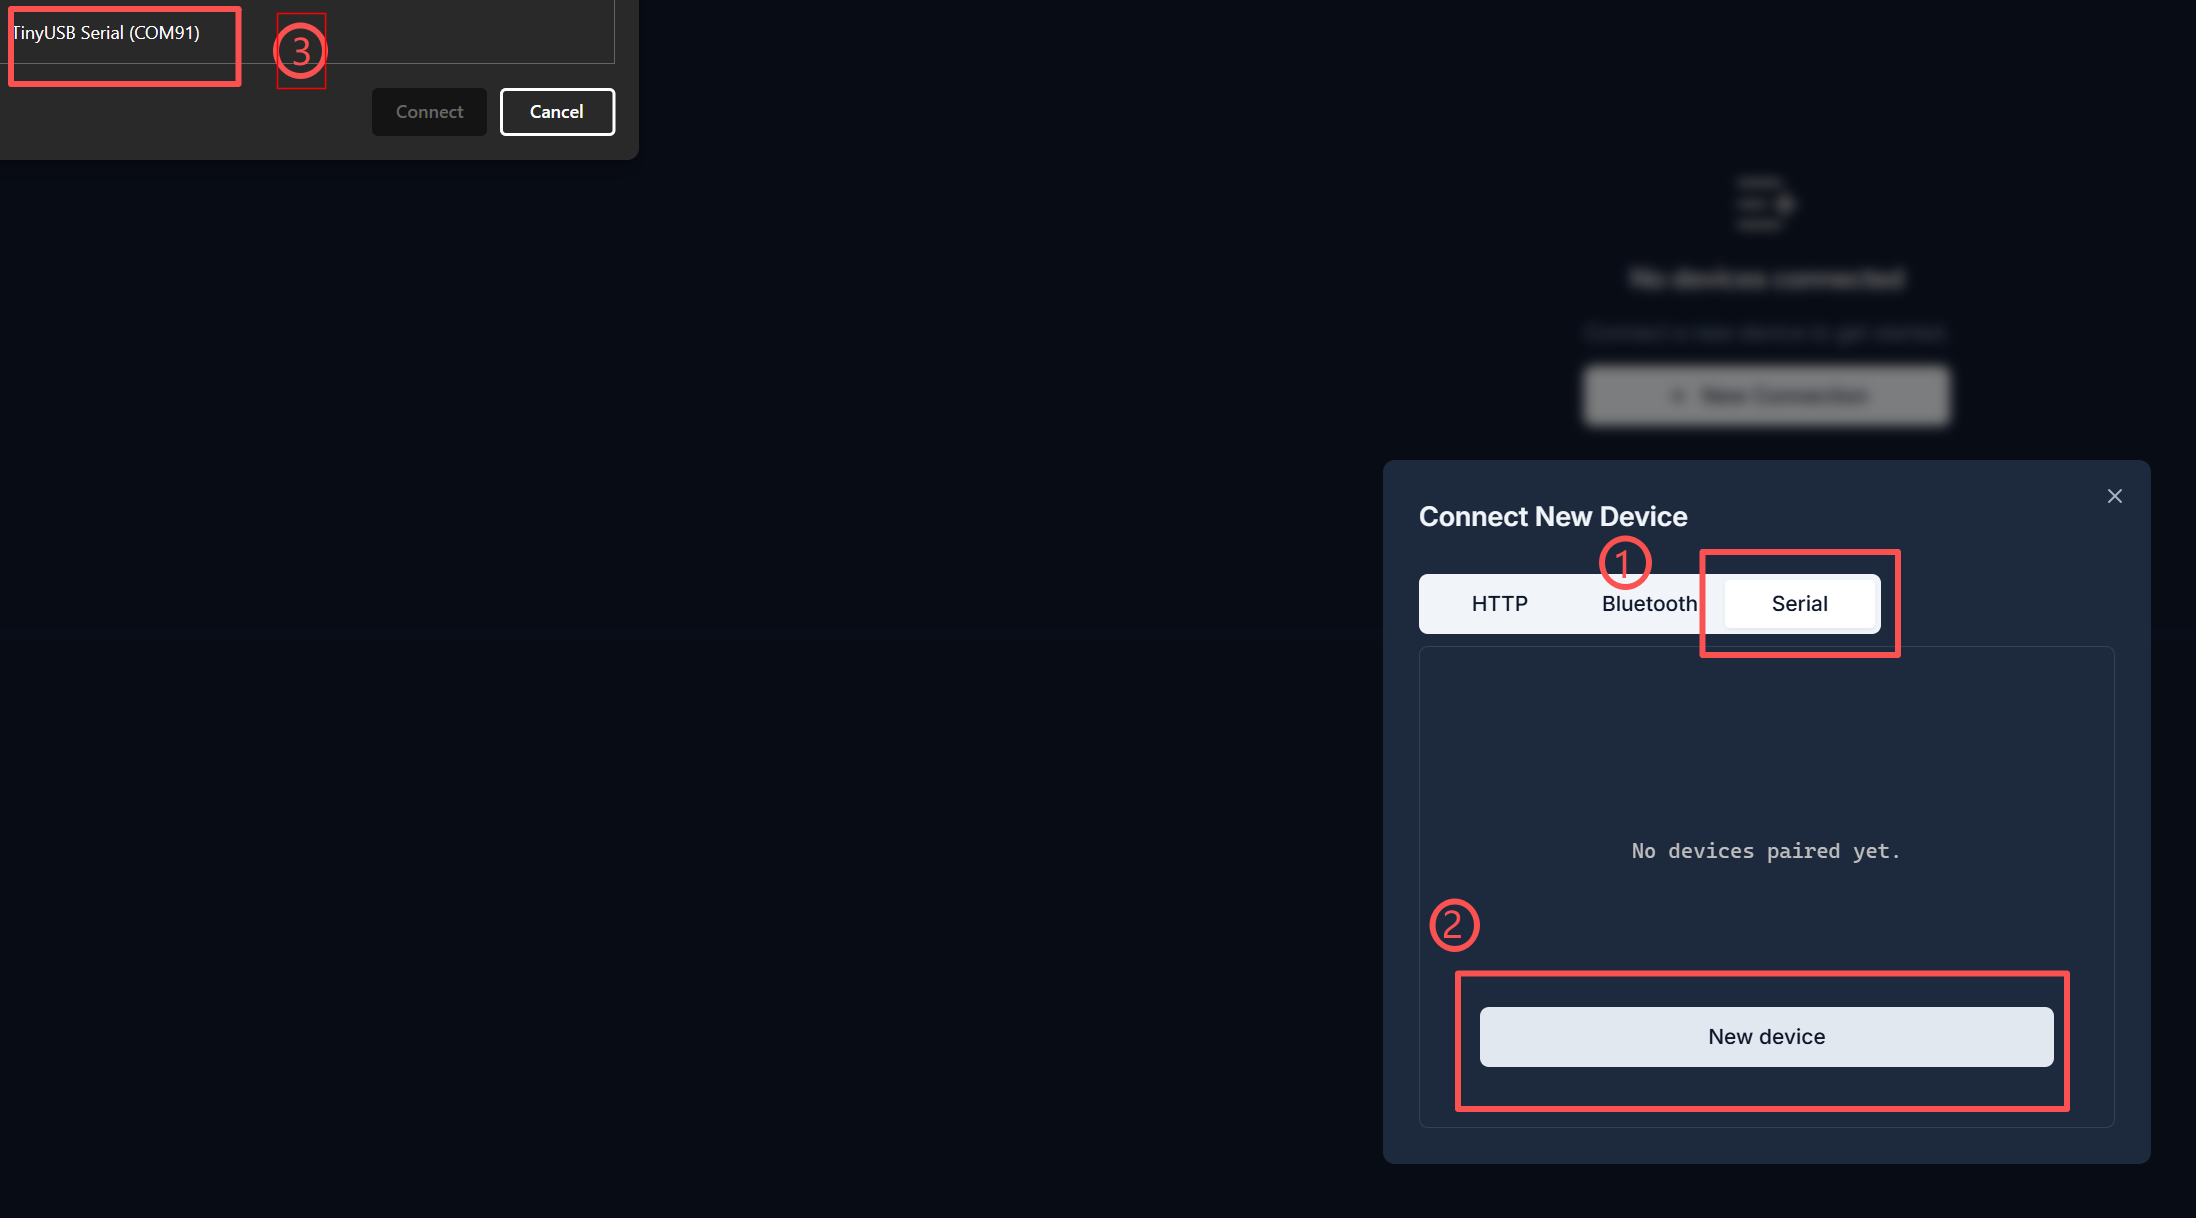
Your device will be displayed in the list. Click to connect. If the connection is successful, you can directly view the device status on the website.

Configuration
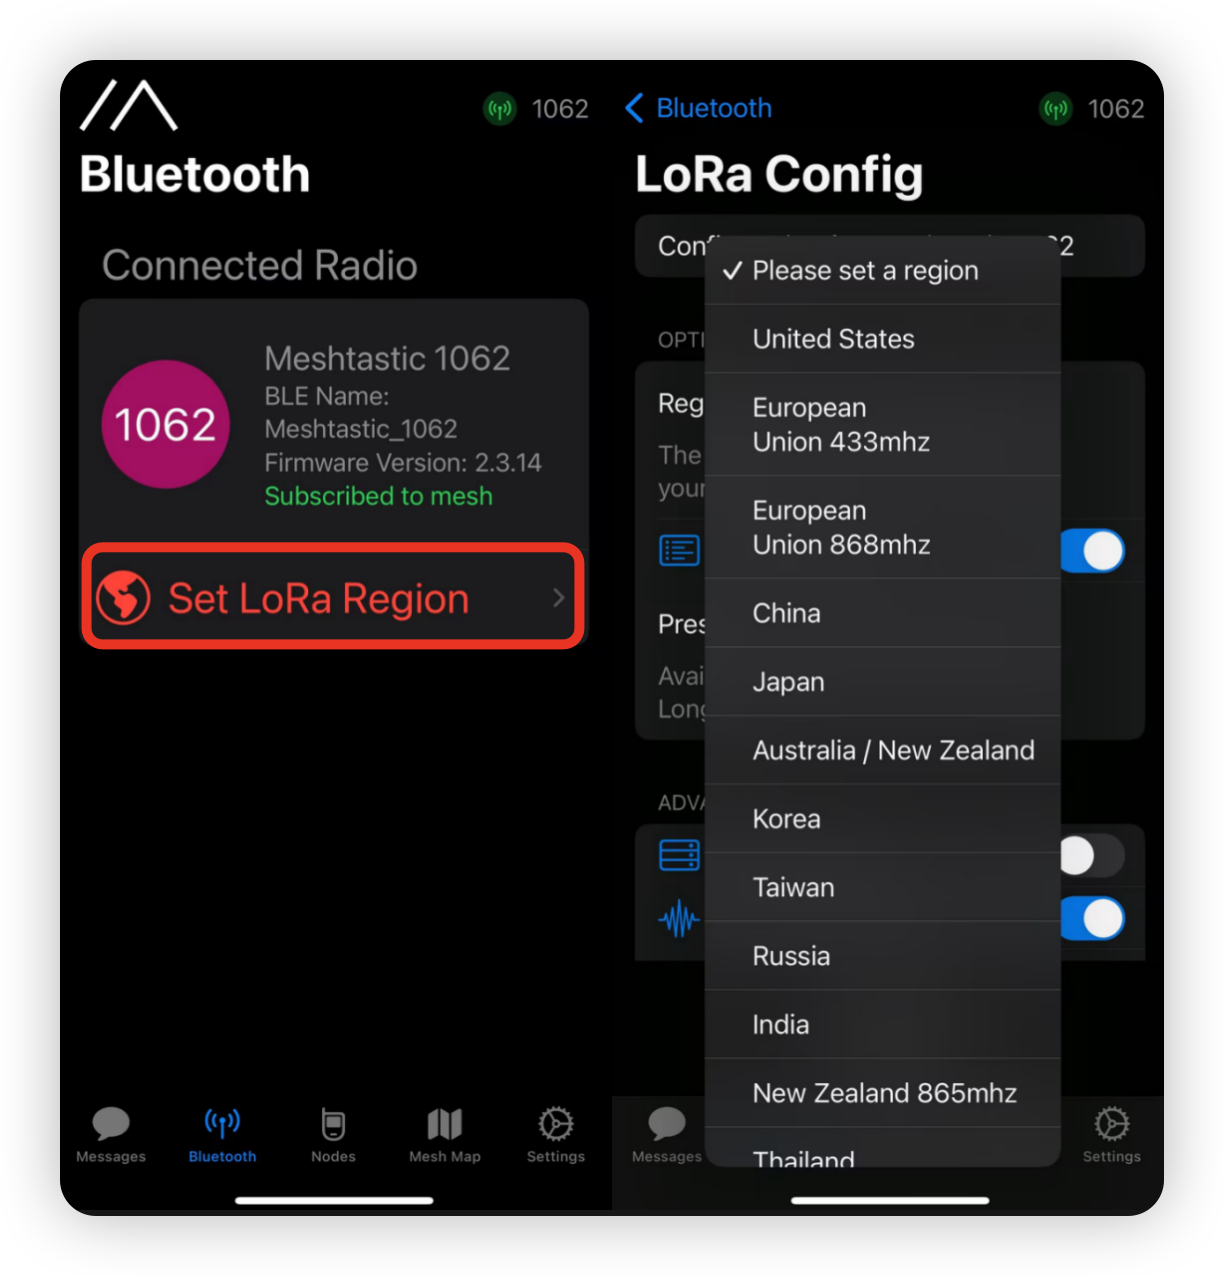
In order to start communicating through the mesh, you must set the region. This setting controls the frequency range used by your device and should be set according to your fault.
iOS application
Android application
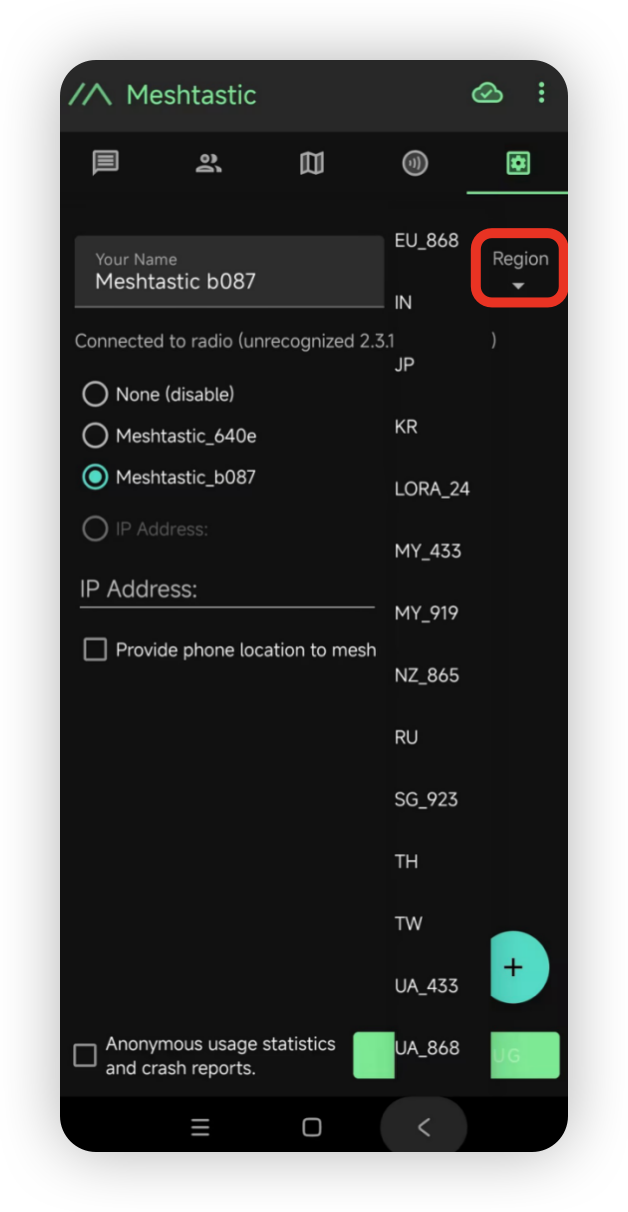
Now that you have set up the LoRa region on your device, you can proceed to configure any LoRa settings to meet your specific needs.
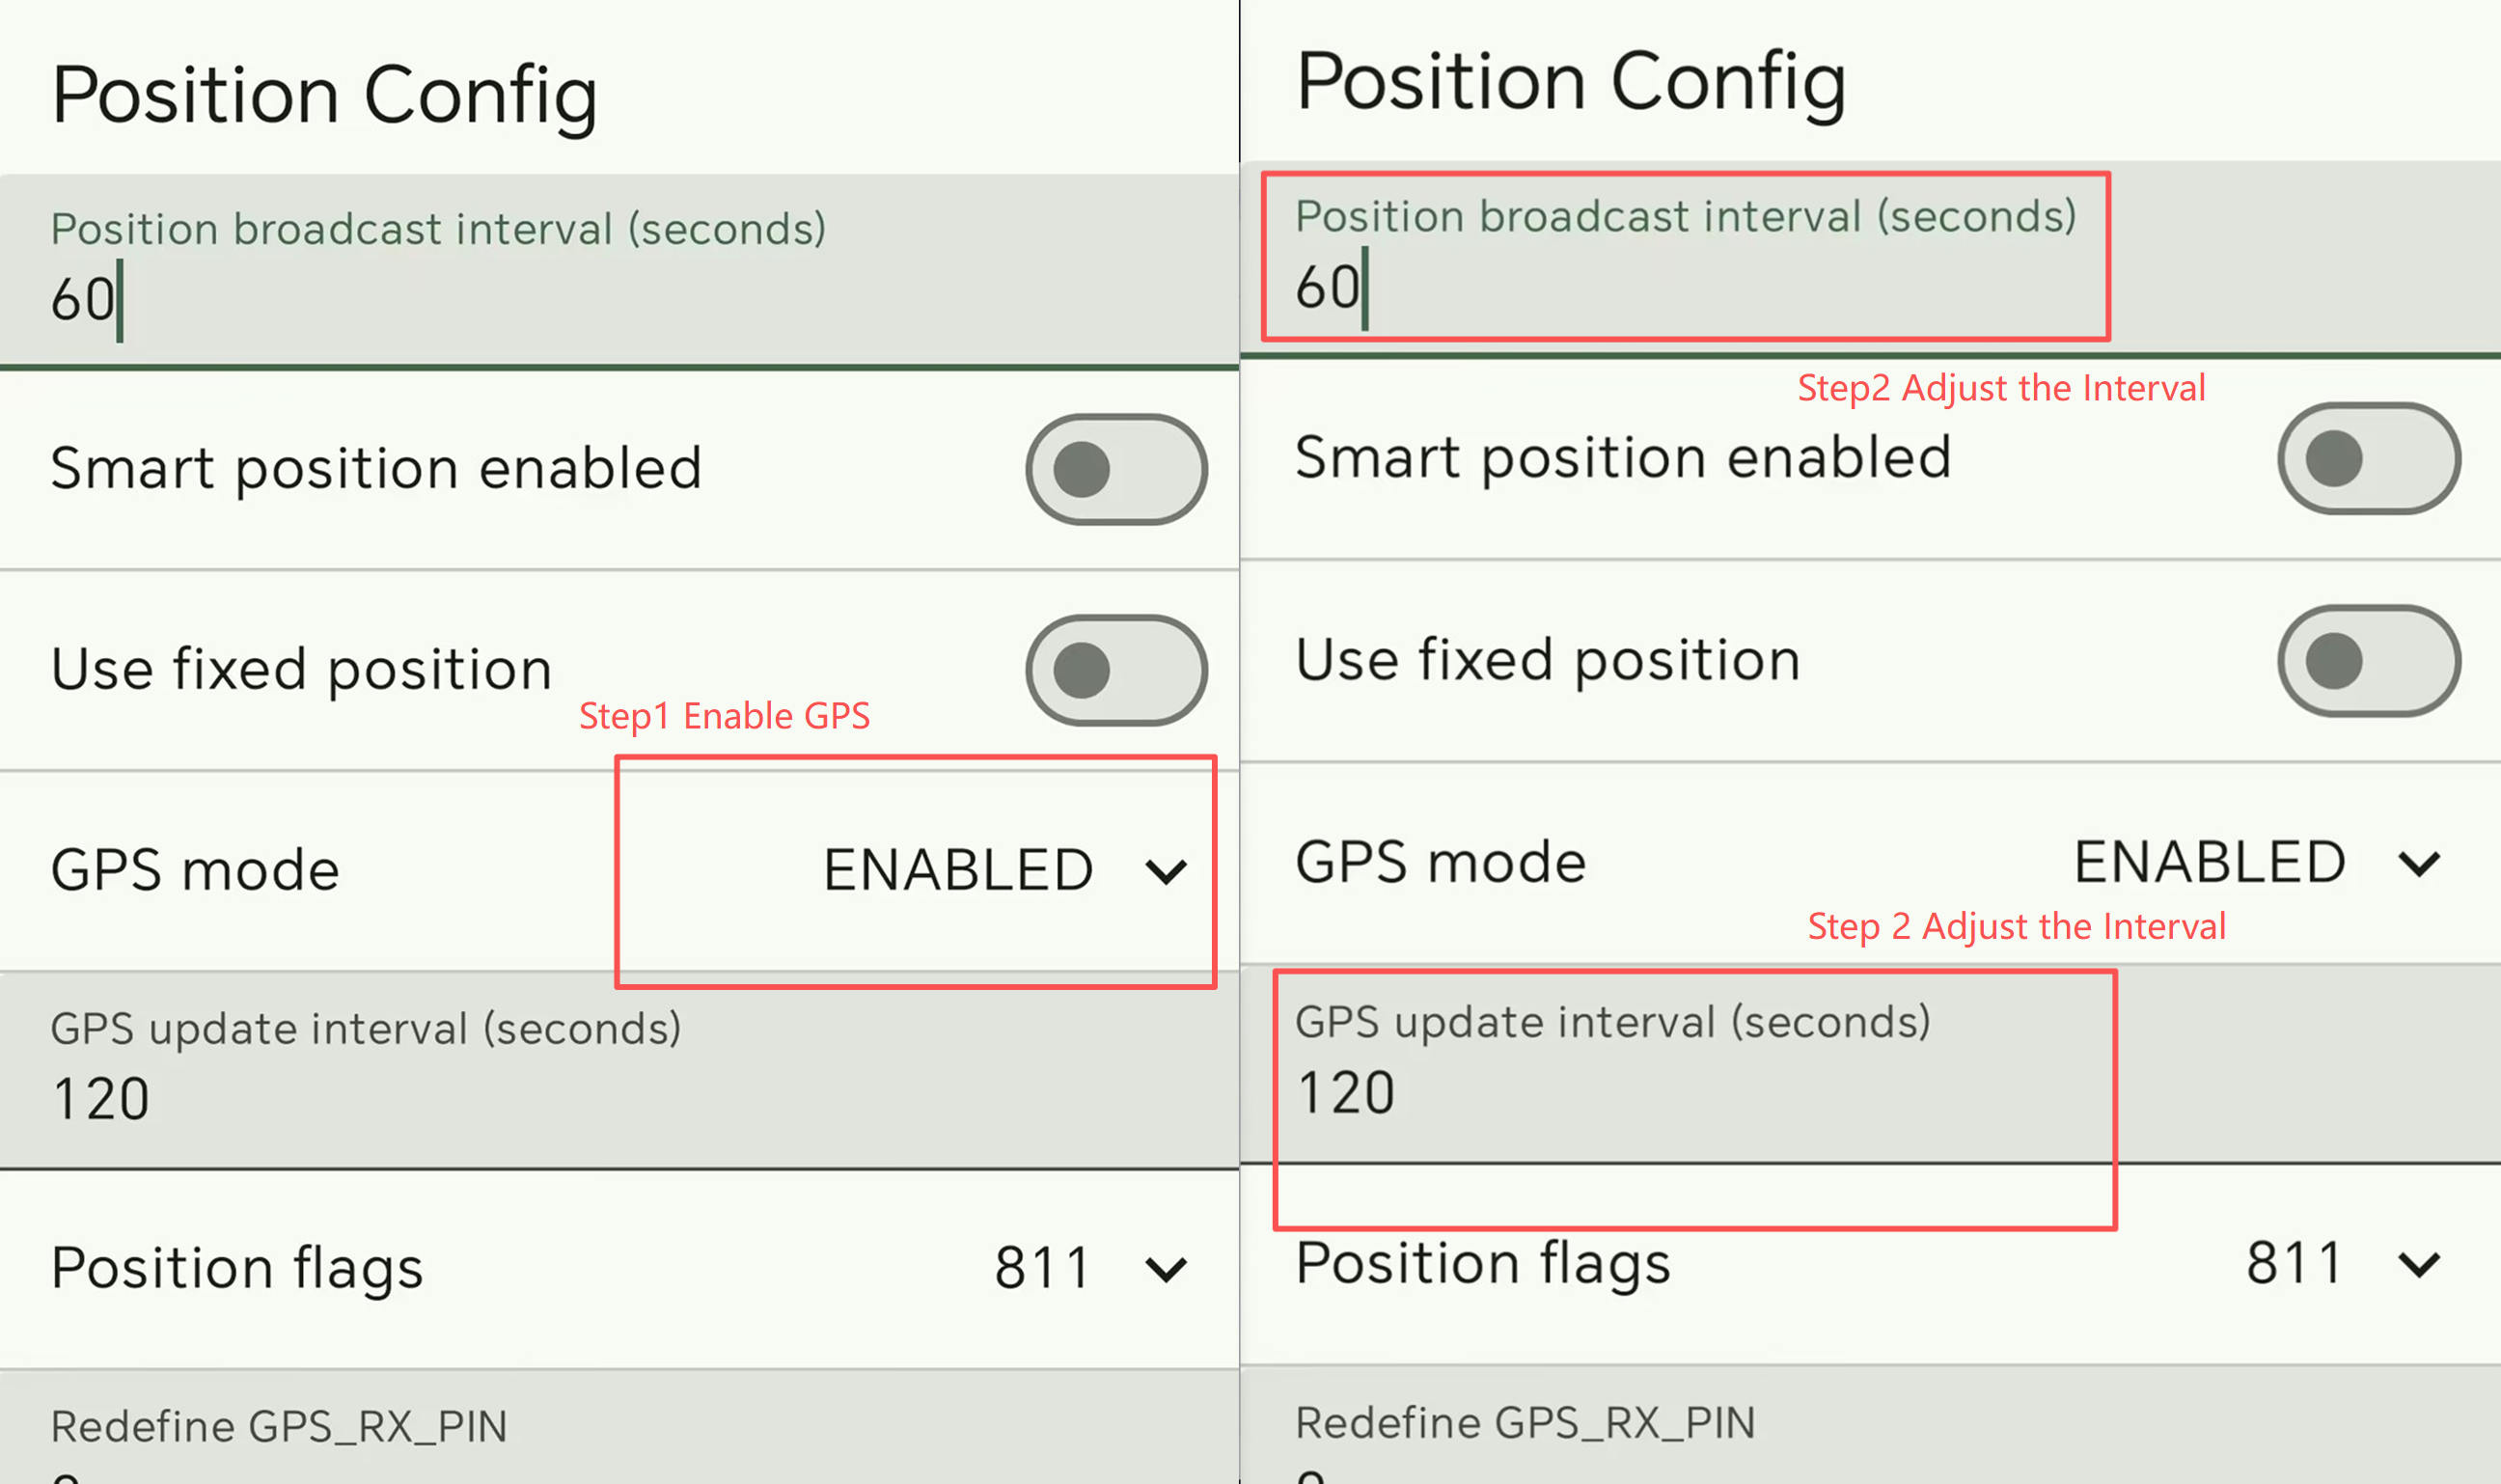
Configure GPS
Please enable GPS. You can adjust the update interval and broadcast interval to obtain more timely location information.
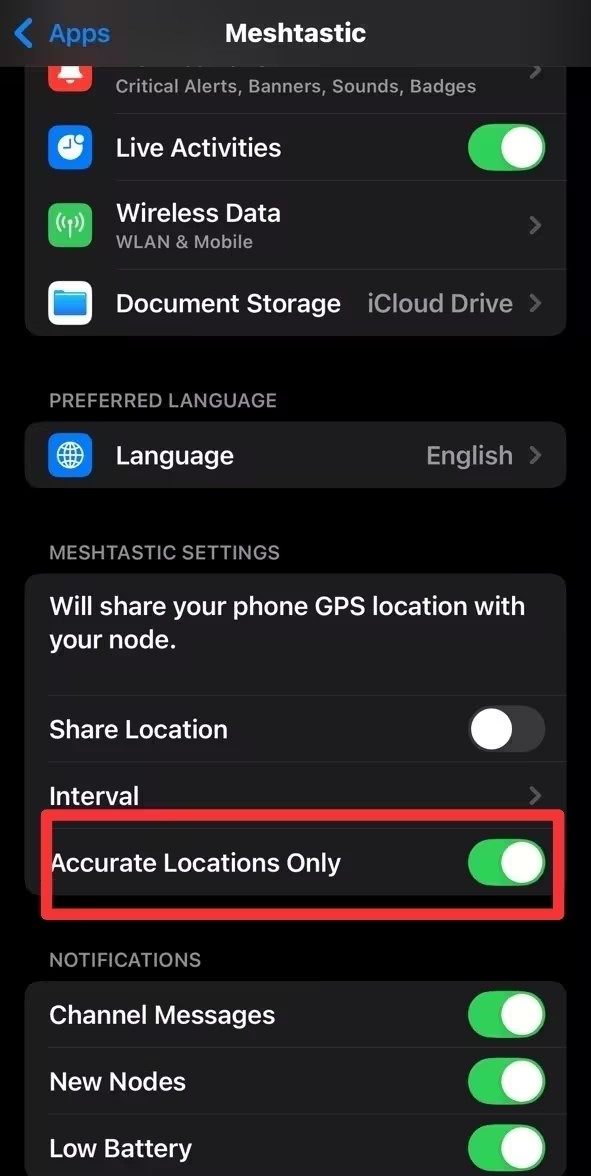
For iOS, please enable Accurate Location. Otherwise, there may be deviations in location determination.
**6.**Firmware & Code
- bootloader
- Construction document
- Telecommunications certification
- FCC Certification
- CE Certification
- Consumption testing and battery consumption calculation
Videos & Media
📺 Tutorials and Demonstration Videos:
https://www.youtube.com/watch?v=6E4dY-J4Jb4
📺 Practical Demonstration and Operation:
https://www.youtube.com/watch?v=mzcdMKscX6M&t=253s
Frequently Asked Questions and Support (FAQ & Support)
Device bricking and bootloader installation
Description:
The device is not responding, there is no LED, and it cannot be paired with your application. If you find that the device completely freezes after flashing its own firmware, you can also try reinstalling the bootloader.
note
When flashing the bootloader, please ensure that the cable connection is stable and do not disconnect it during the flashing process.
-
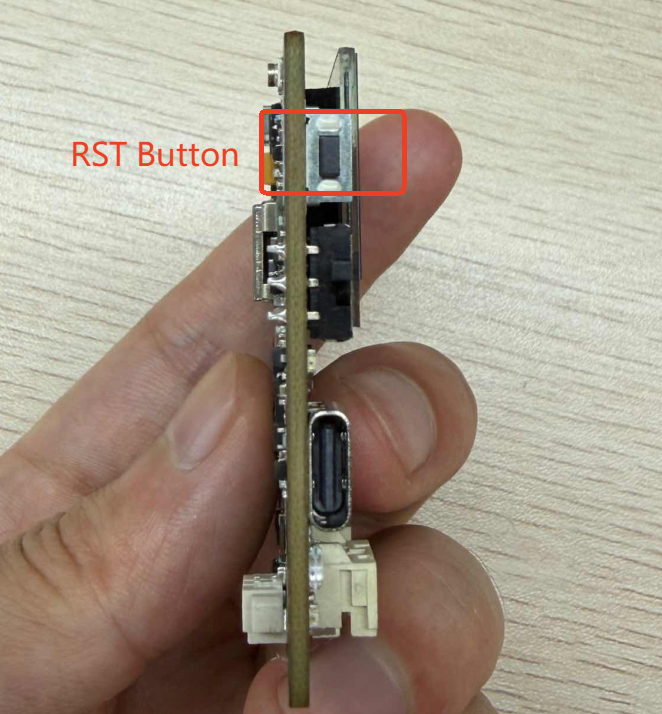
Step 2: Enter DFU mode
Double-click the RST button to enter DFU mode. The disk name "Tracker L1" will pop up.
-
Step 3: Paste the bootloader file
Overwrite all files on the disk with the downloaded bootloader file.
-
Step 4: Flash firmware
After completing the aforementioned steps, you can flash the application firmware. You may need to manually enter DFU mode
Unable to enter DFU and manually enter DFU mode
Connect the device to your PC and double-click the Reset button. The yellow LED will remain continuously lit, and a new USB drive named Tracker L1 will appear on your PC.
Exit DFU mode
Press the Reset button once to exit DFU mode.
Automatic device shutdown
Description
- After the device is turned on, it will automatically shut down or restart after a period of time.
- The serial port log stops after running for a period of time.
This may be caused by manually forcing a restart or shutdown of the device when it is in the following states: unfinished message transmission process, or in the process of configuration .....
Troubleshooting
Click here to watch the video. You need to perform a flash erase and then re-flash the latest firmware.
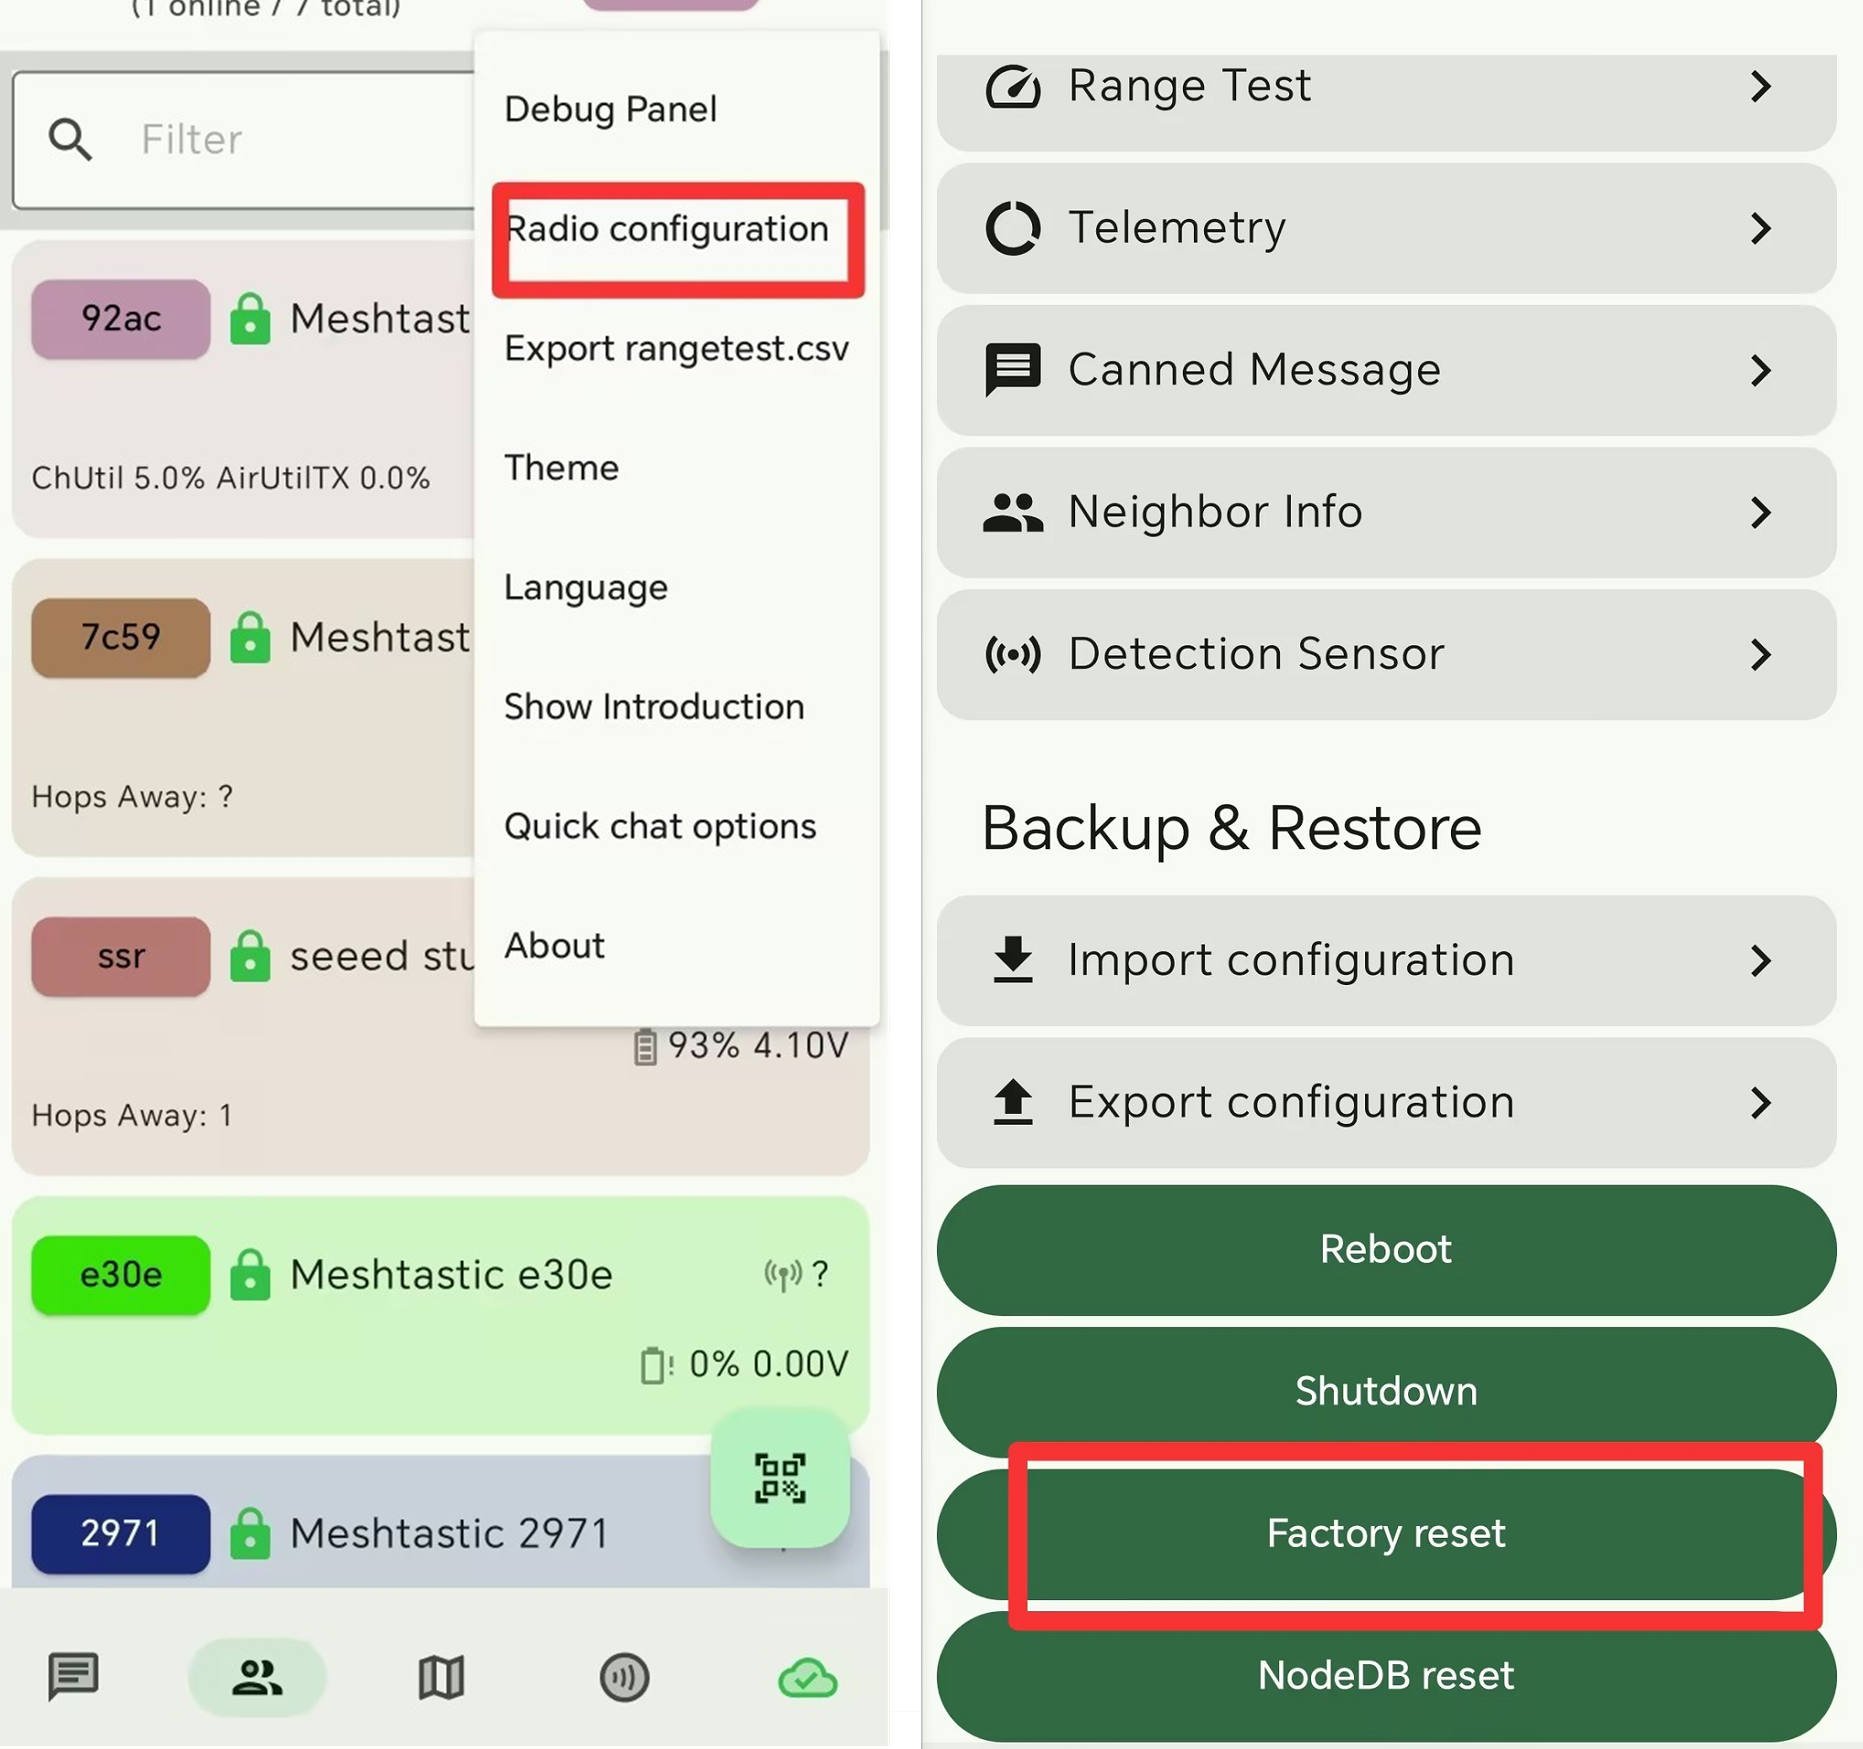
Restore factory settings
If you wish to revert to the default settings, you can perform a factory reset. There are two methods to perform a factory reset.
- Click here to watch the video. You need to perform a flash erase and then re-flash the latest firmware.
- Click the
Factory Resetbutton in the app. The device will automatically restart using its factory settings.
Signal quality
- SNR reflects the quality of the communication link. Normal devices usually operate above -7 dB. Devices with SNR below -10 dB indicate poor performance.
- RSSI is determined by both the device and its surrounding environment. Normal devices typically operate above -110 dBm. Devices with RSSI below -115 dBm are considered to have poor performance.
To achieve the best signal effect, please use the device in an open, unobstructed area with minimal interference.
Compatible Antennas
If you need to replace the antenna for Meshnology N37, click here to obtain one.
If you need to obtain the complete kit of Meshnology N37, click here to acquire one.