N39 WiFi LoRa 32 V4 Development Kit
1. Overview
Meshnology N39 WiFi LoRa 32 V4 Development Kit An upgraded LoRa development board based on ESP32-S3R2 + SX1262, supporting Wi-Fi (802.11 b/g/n), Bluetooth BLE and LoRa wireless communications. Ideal for Meshtastic nodes and diverse IoT applications. Supports solar input, lithium battery power supply, and GNSS expansion.
2. Product Description
This development kit represents the V4 upgrade to the classic WiFi LoRa series, delivering significant enhancements in performance, power consumption, memory capacity, and expandability:
-
Main controller: ESP32-S3R2 dual-core processor
-
LoRa chip: SX1262, maximum output power of 27 ± 1 dBm
-
Memory: 2 MB PSRAM + 16 MB external Flash
-
Display: 0.96-inch OLED
-
Power supply: USB-C powered, 3000 mAh rechargeable lithium battery (pre-installed)
-
Extension: Supports Solar input and GNSS expansion interface
-
Applicable frequency band: 863–928 MHz LoRa frequency range (via hardware matching)
3. Technical Specifications
| Parameter Classification | Detailed Explanation |
|---|---|
| MCU | ESP32-S3R2 Dual-Core (Wi-Fi, Bluetooth 5 & BLE) |
| LoRa | Semtech SX1262, supporting 863–928 MHz |
| Output power | 27 ± 1 dBm |
| Memory | 2 MB PSRAM + 16 MB Flash |
| Display screen | 0.96″ OLED(128×64) |
| Power supply | USB-C / 3000 mAh battery / Solar input |
| Extension Interface | GNSS (SH1.25-8Pin), Solar (SH1.25-2P) |
| Dimensions (approximately) | 85 × 45 × 35 mm(Including the casing) |
| Weight (approximately) | ~100 g(Including battery and casing) |
4. Hardware Details
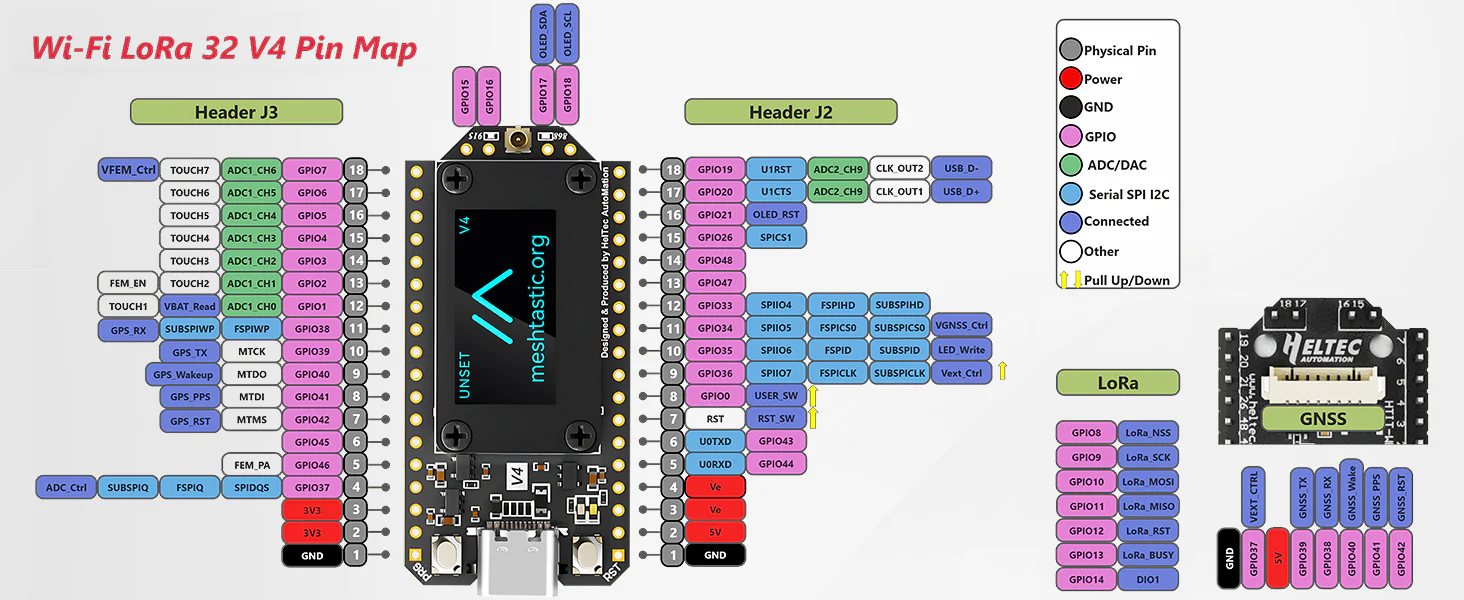
4.1 Pin Description
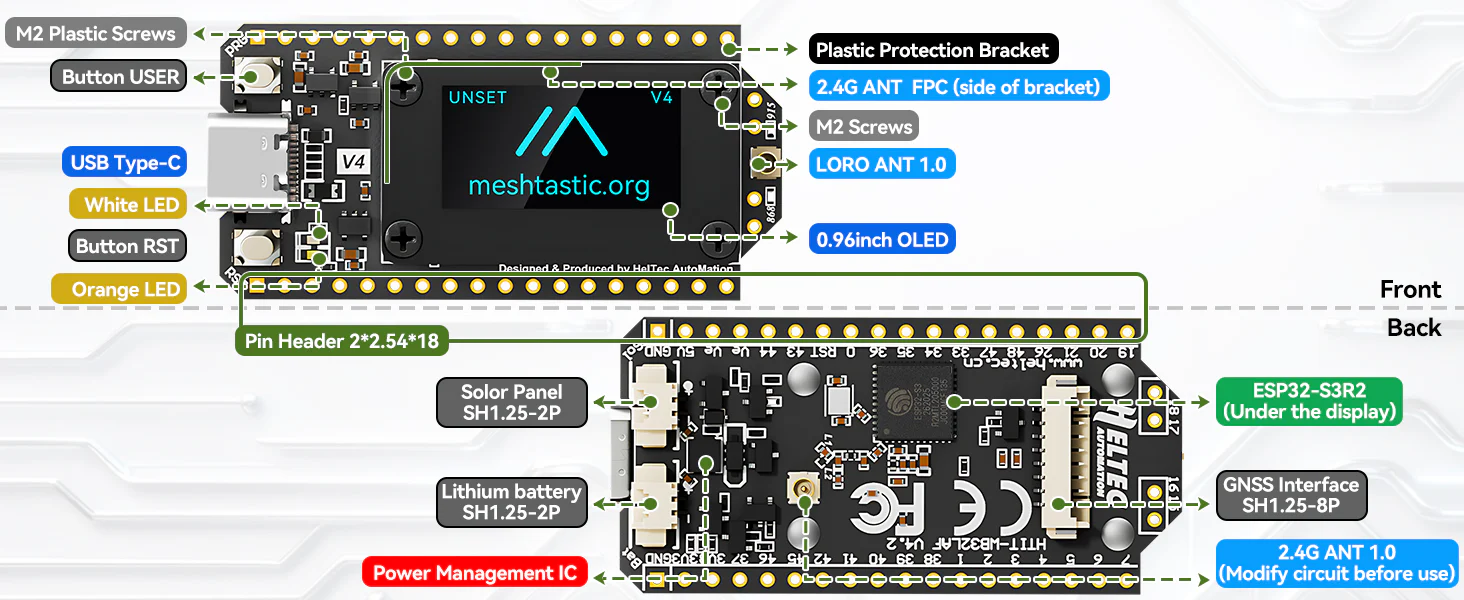

4.2 On-Board Interface Specifications
-
USB-C Interface:Power supply and firmware programming
-
OLED display screen:Real-time status information and debugging output
-
LoRa Antenna interface:863–928 MHz Antenna
-
GNSS Expansion port:Supports GPS expansion module
-
Solar Import port:Can be connected to solar panels
-
Lithium battery holder:Pre-installed 3000 mAh battery with automatic power switching capability
4.3 Power Consumption and Power Management
V4 supports an ultra-low power standby mode (≤ 20 µA), featuring overcharge protection, over-discharge protection and an automatic priority USB/Solar/Battery power supply strategy.
5. Getting Started
5.1 Contents of the box
-
Heltec WiFi LoRa 32 V4 Development Board
-
3000 mAh rechargeable lithium battery (pre-installed)
-
863–928 MHz LoRa antenna
-
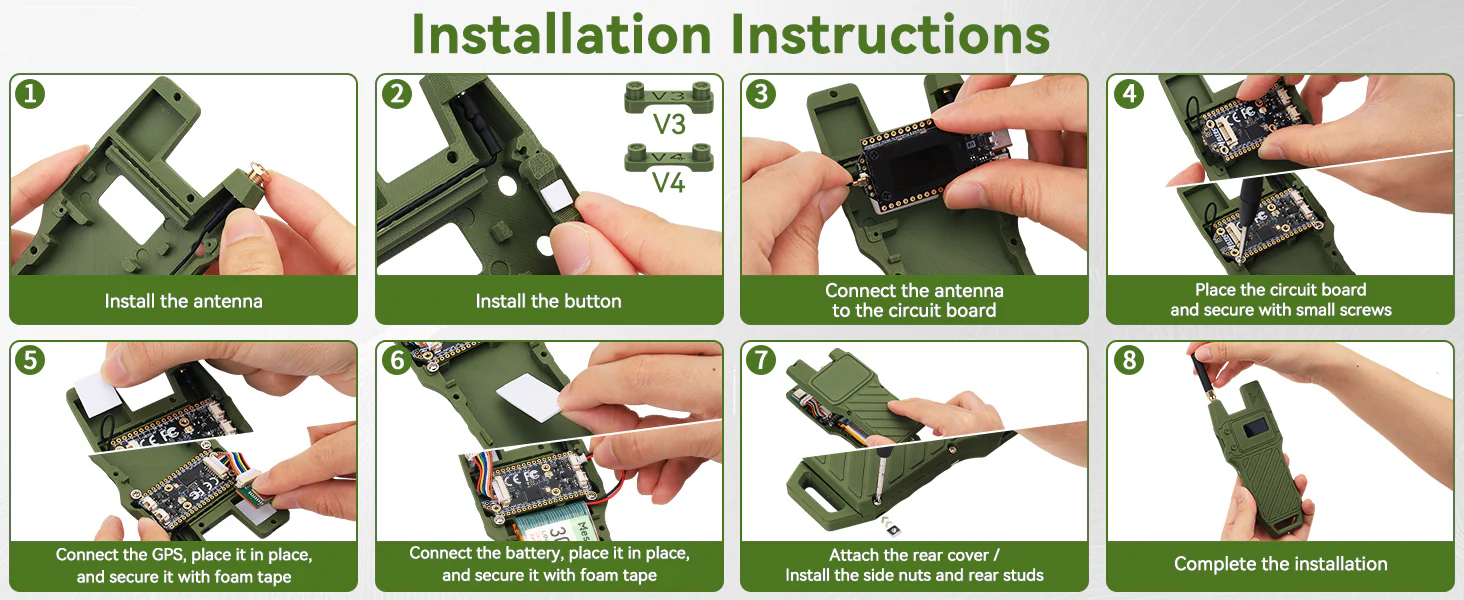
N39 3D Protective Case Kit (Multiple Colour Options)
5.2 Initial connection
-
Connect to a computer via USB-C (for power supply and firmware programming)
-
Switch on the OLED display to observe the basic start-up information.
-
Configure Meshtastic Settings (e.g. Zone / Frequency)
-
Download and install the Meshtastic App for Bluetooth pairing.
How to use
Note: This guide uses the WiFi LoRa 32 V3 as an example to demonstrate the complete Meshtastic setup, starting from firmware flashing.
Install ESP32 USB to Serial Adapter
Connect your computer to the device using a USB cable. Open your computer's Device Manager and check the Ports section. If the computer fails to recognise the device, you may need to download and install the CP210X USB-to-UART bridge driver from Silicon Labs:CP210X USB to UART Bridge - Downloads
‼️Presentation
After installing the driver, please ensure you restart your computer to complete the installation process.
How to use the webpage
The web-based installer requires Chrome or Edge browsers and is an excellent choice for rapidly flashing device firmware. This method is straightforward to use, particularly suited to new users of the project, and is therefore highly recommended for firmware flashing.
-
Insert your device.
-
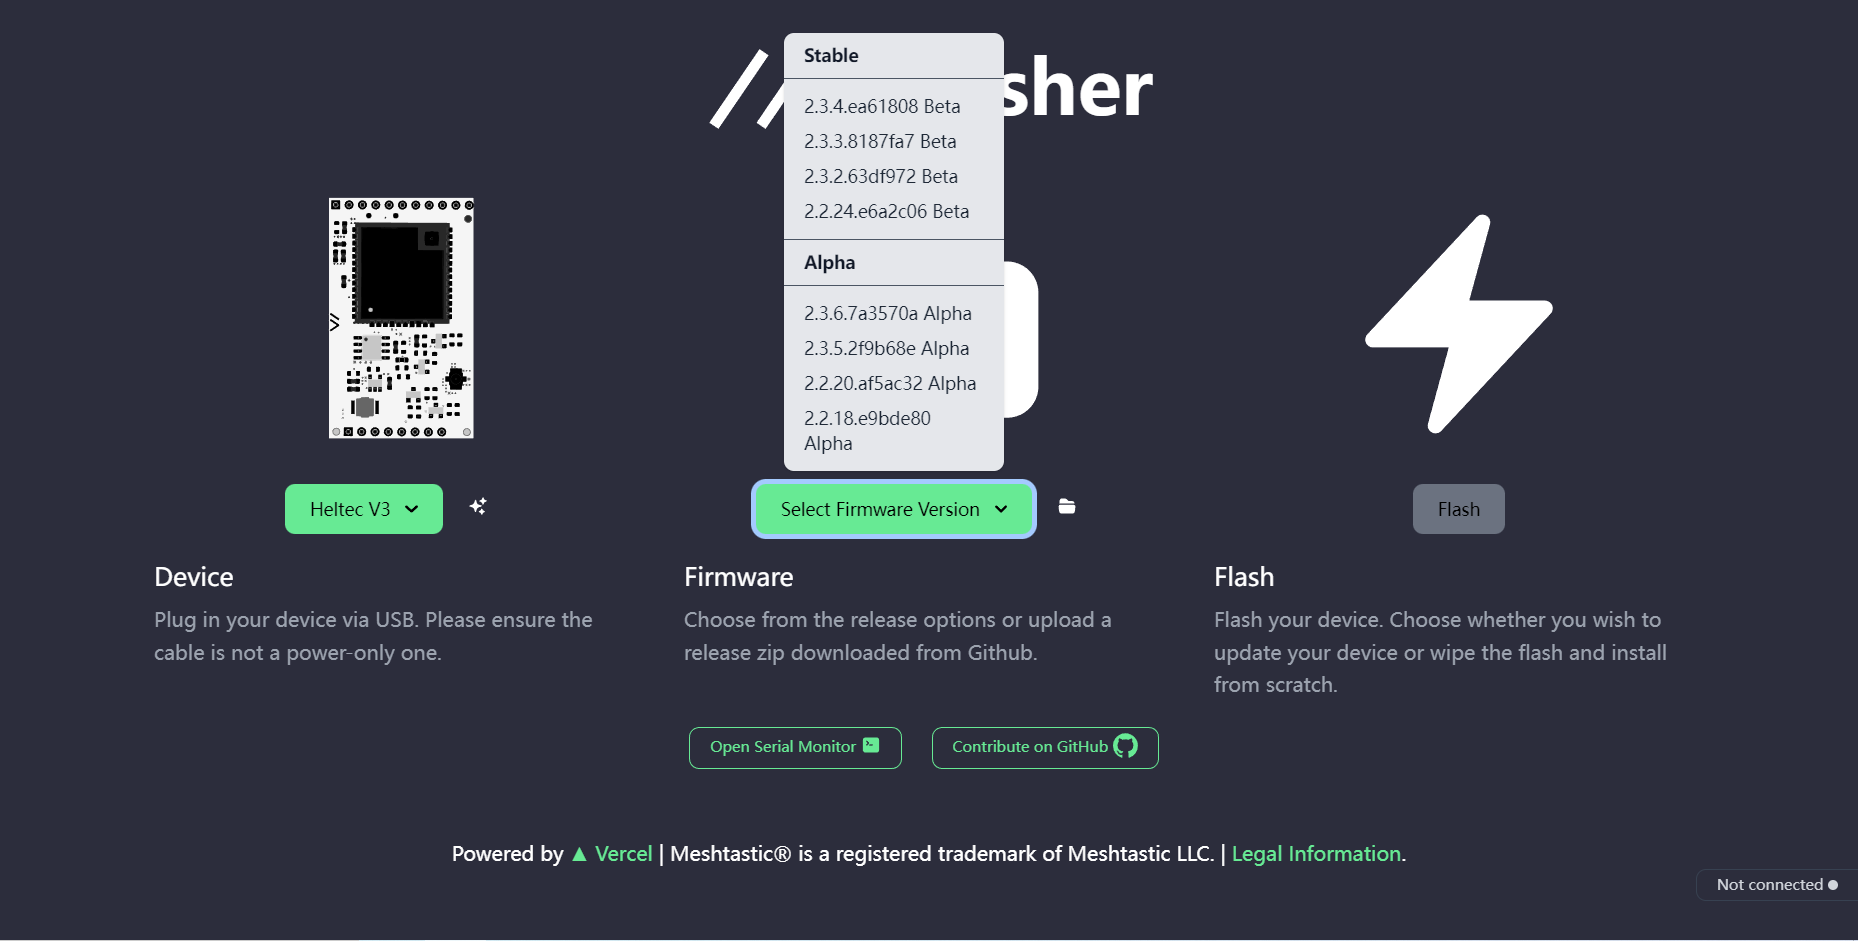
Accessing flasher.meshtastic.org requires the Chrome or Edge browser. Follow the instructions and select the corresponding circuit board model.
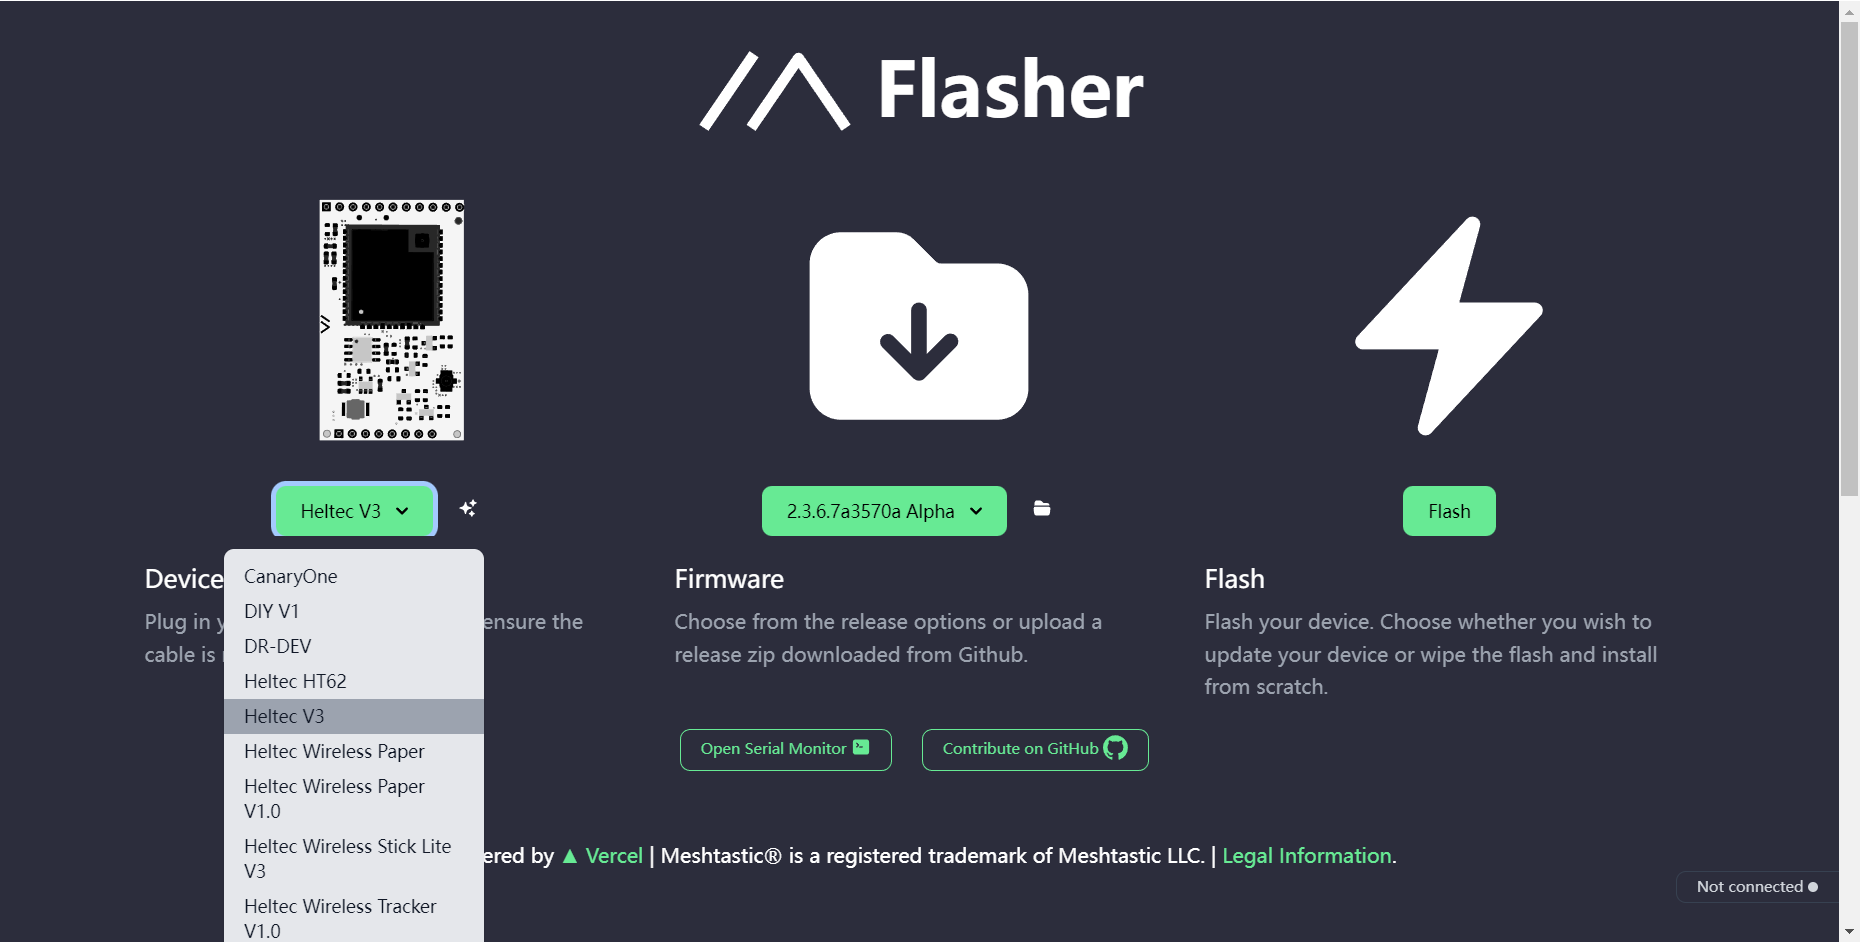
-
Select the appropriate firmware version; it is generally recommended to use the latest stable release.
-
Click the Flash button.

‼️Presentation
Network issues may prevent Flash buttons from being clickable. Naturally, buttons may occasionally appear greyed out yet remain functional.
-
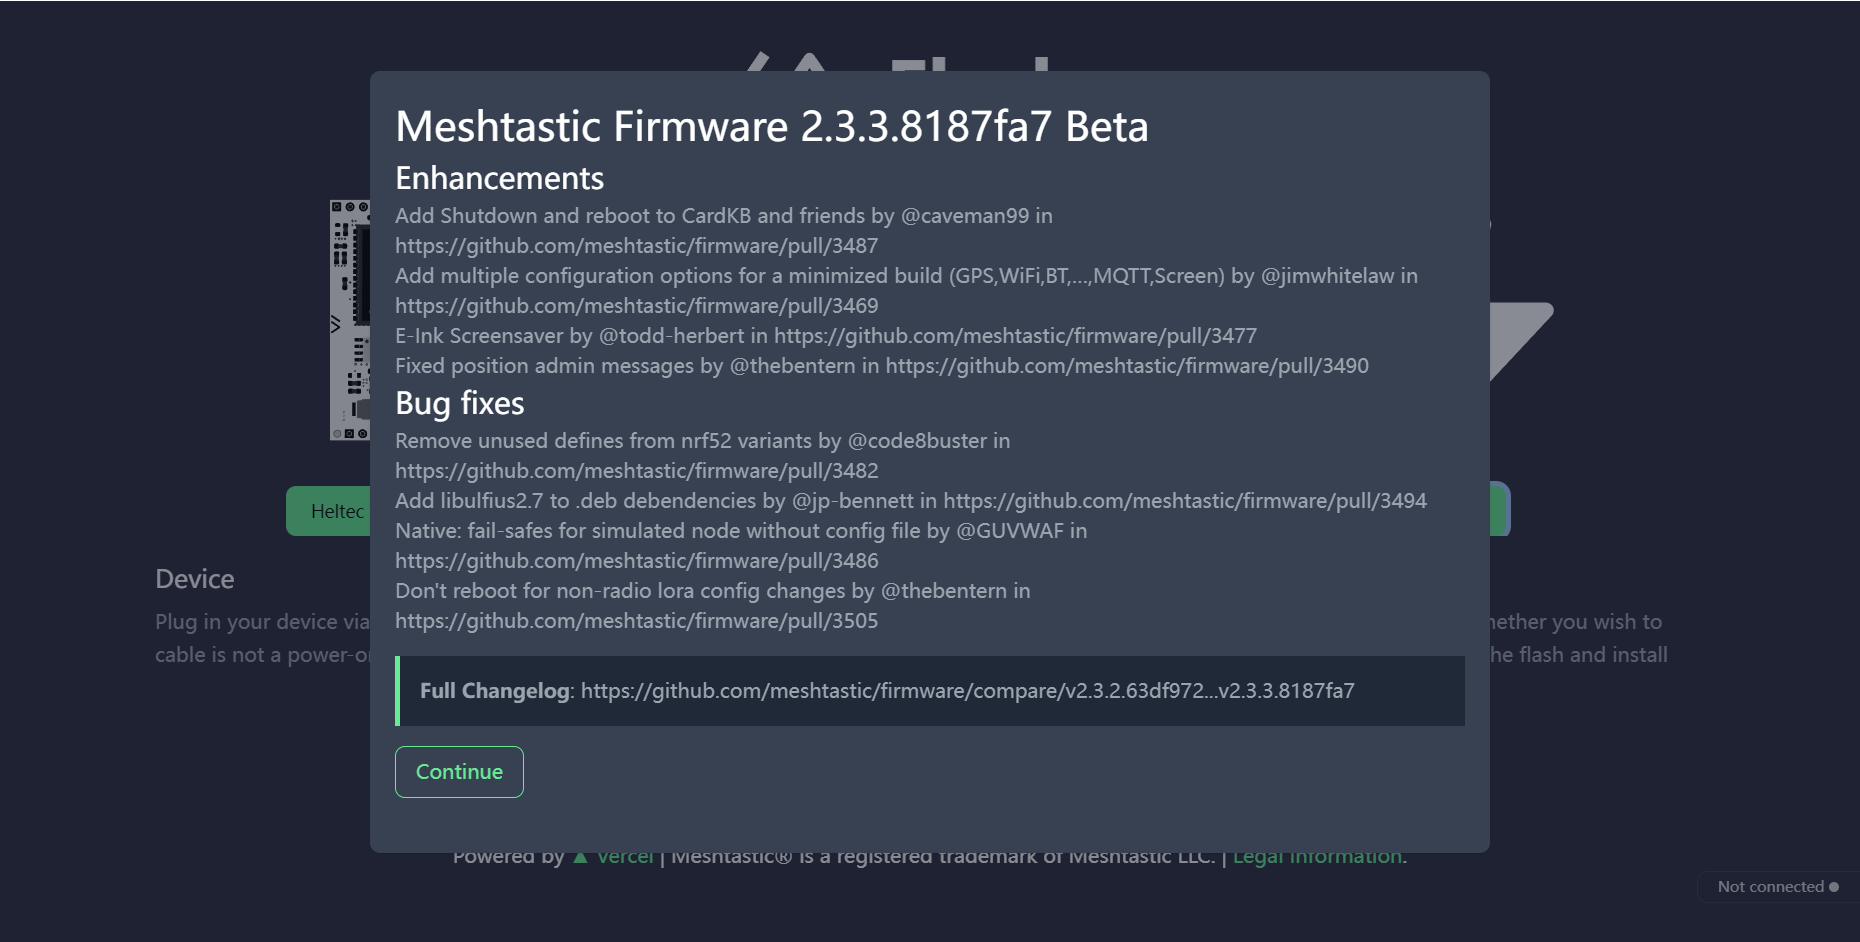
Carry on.
-
Click
Full Erase and Install,Then clickErase flash and install。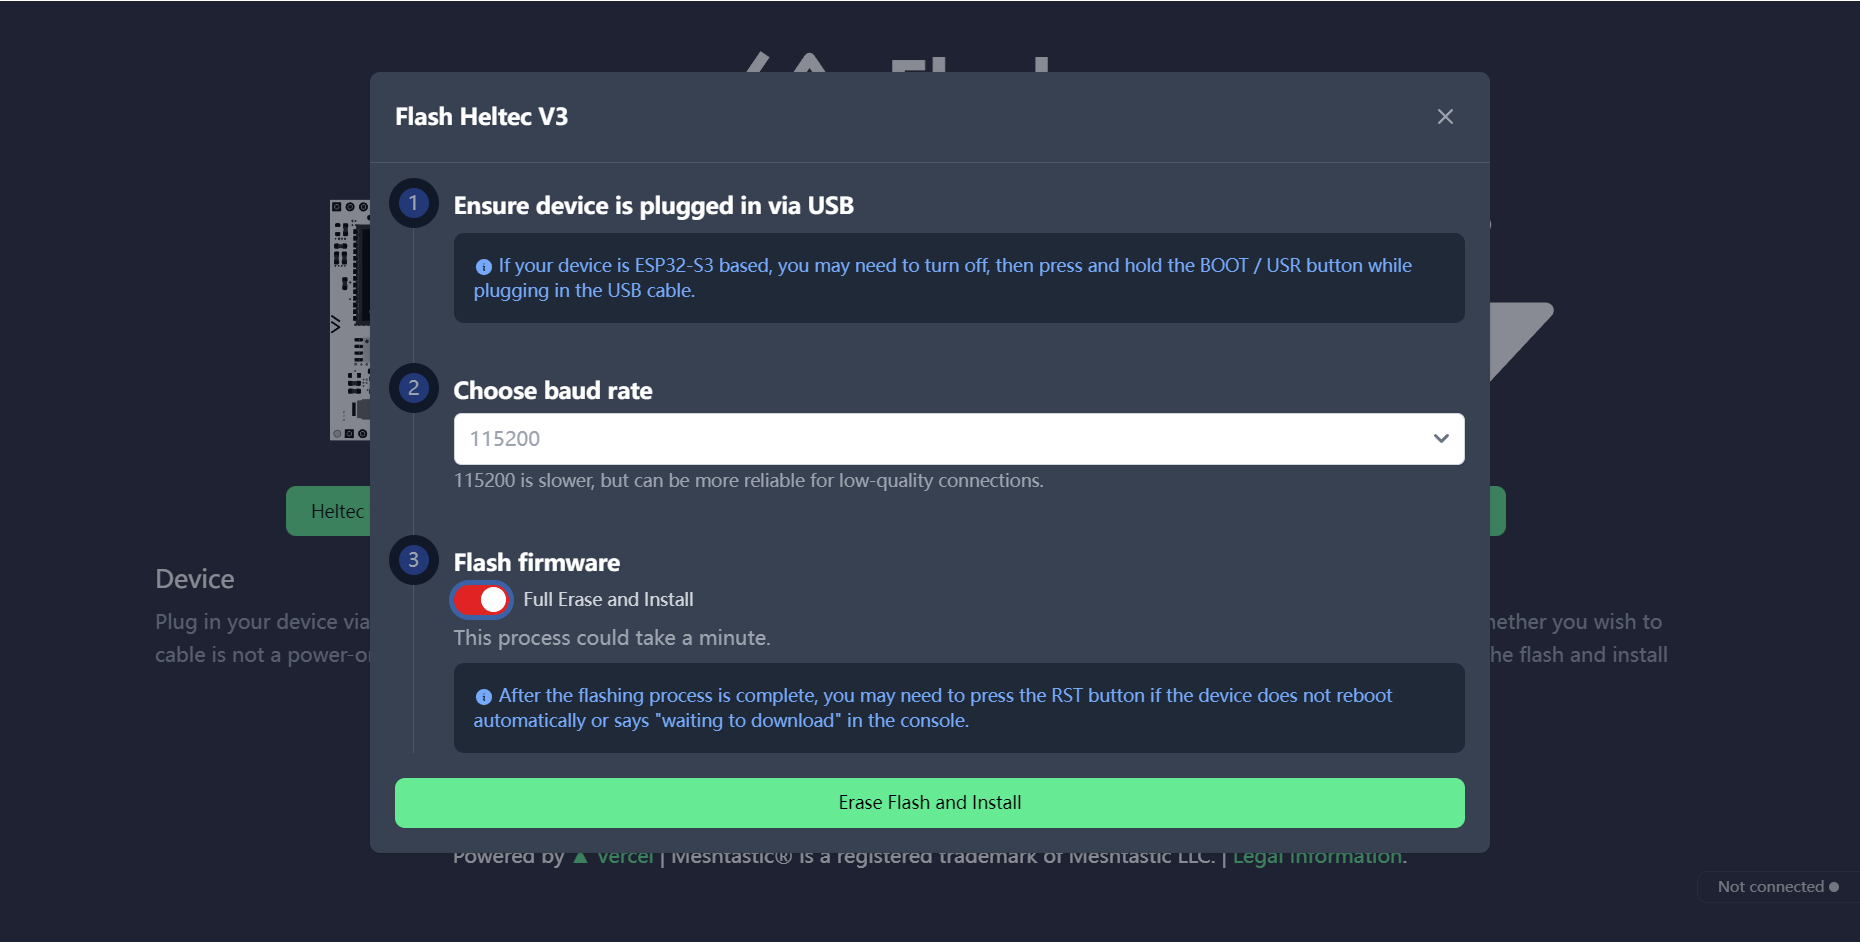
💡Presentation
Network issues are causing the Flash page to continuously display "Connecting..."
-
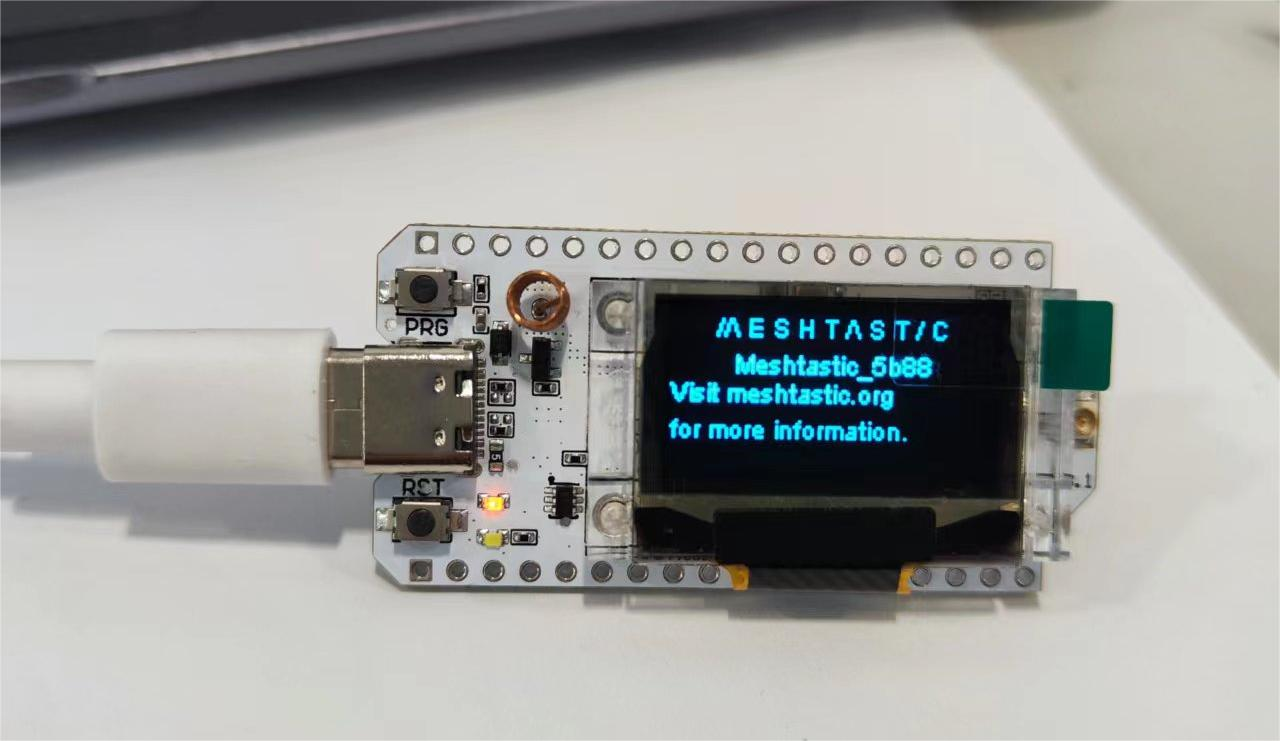
Once the firmware update is complete, your device screen will display
Meshtastic.
Installing Meshtastic
Taking the Android system as an example, we shall demonstrate the basic usage of the app. We will continue to update the procedures for iOS and web versions in the future.
Setup Area
To commence communication via mesh networks, you must configure your regional settings. This configuration governs the frequency range utilised by your device and should be adjusted according to your geographical location.
-
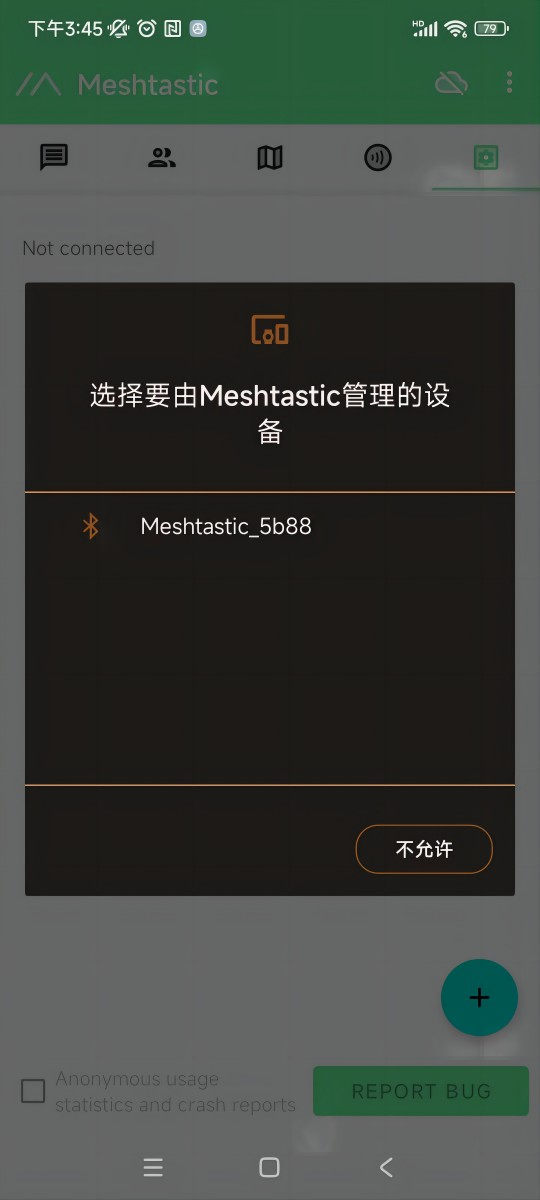
Open the application and locate your device via Bluetooth (as shown below). Tap to connect the device.
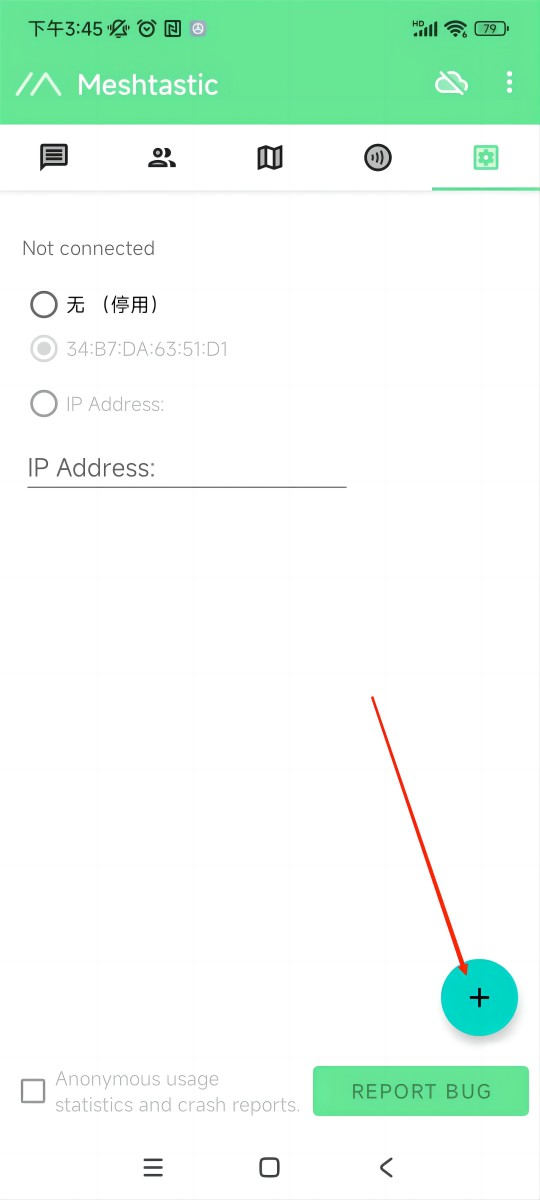
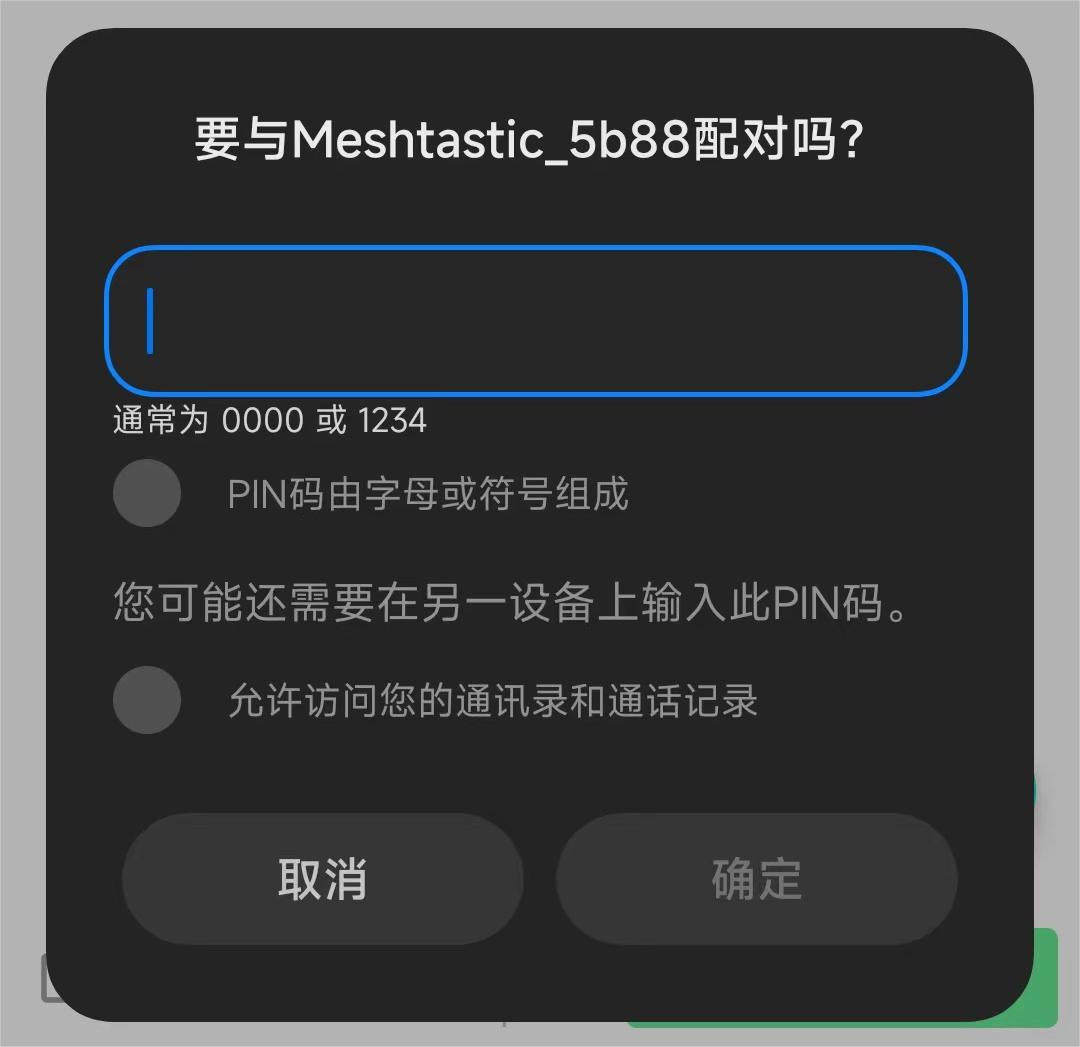
💡Presentation
Should a window prompting for a verification code appear, you will need to consult your device's display. For devices lacking a screen, the default verification code is typically 123456. If this does not apply, please contact the firmware publisher.
-
After pairing is successful, click 'Cancel Setup' next to the device name. Select the appropriate region from the list based on your location. Naturally, your hardware must support this frequency band.
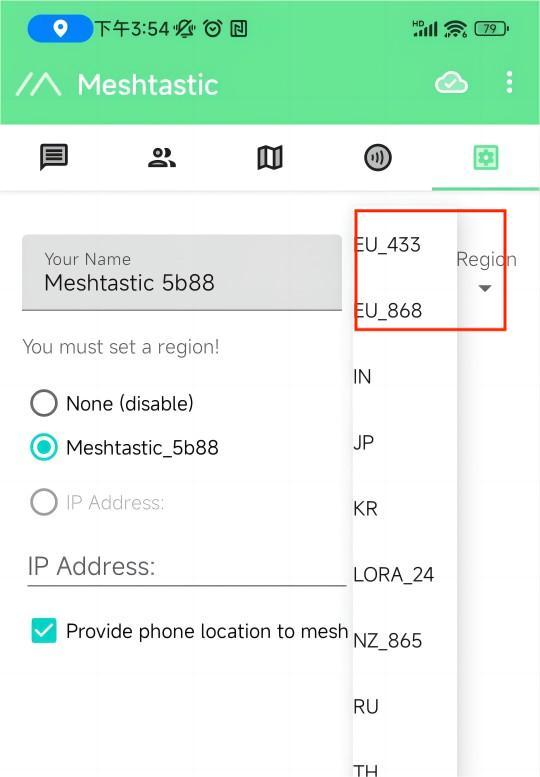
You may refer to this link to understand the relationship between LoRaWAN frequency bands and regions:LoRaWAN_frequency_plans_by_country
Notes
The hourly duty cycle for EU_433 and EU_868 is limited to 10%. Should this limit be reached, your device will cease transmission until it is authorised to transmit again.
-
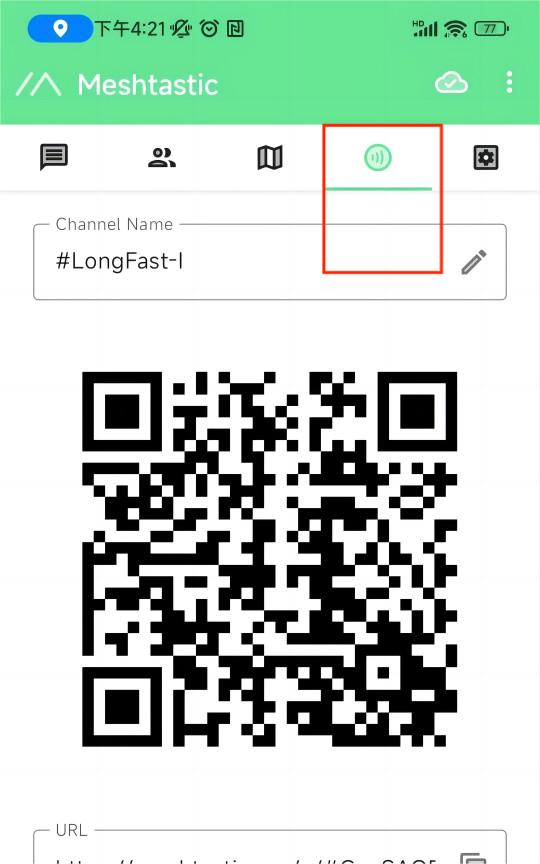
Click the option below to select the channel you wish to join.
Getting started
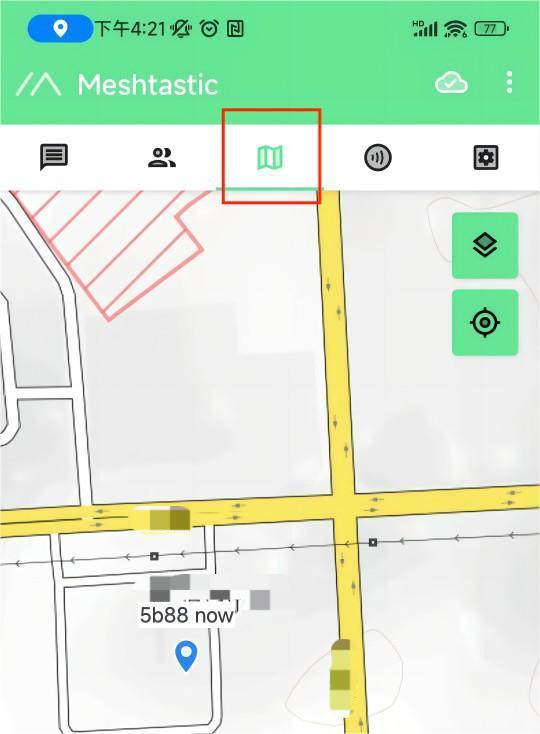
-
The map option will enable viewing of a companion's location information, which may be provided by the device's GPS module or by a mobile phone connected to the device.
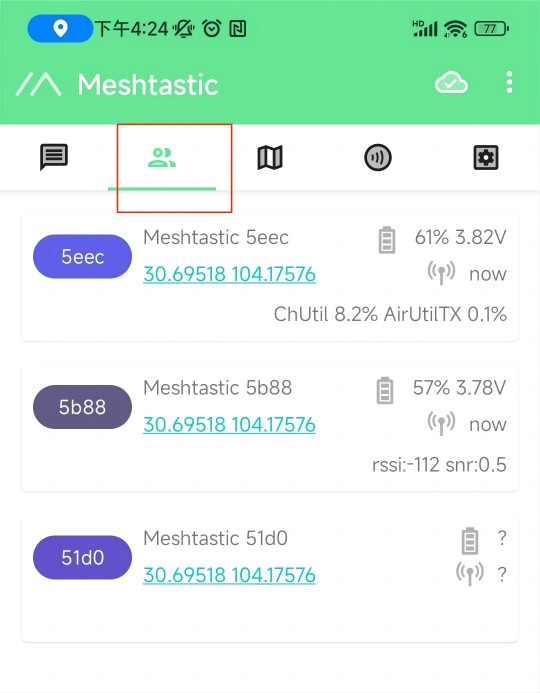
-
The following options display information about the accompanying device, such as latitude and longitude, signal strength, battery level, and so forth.
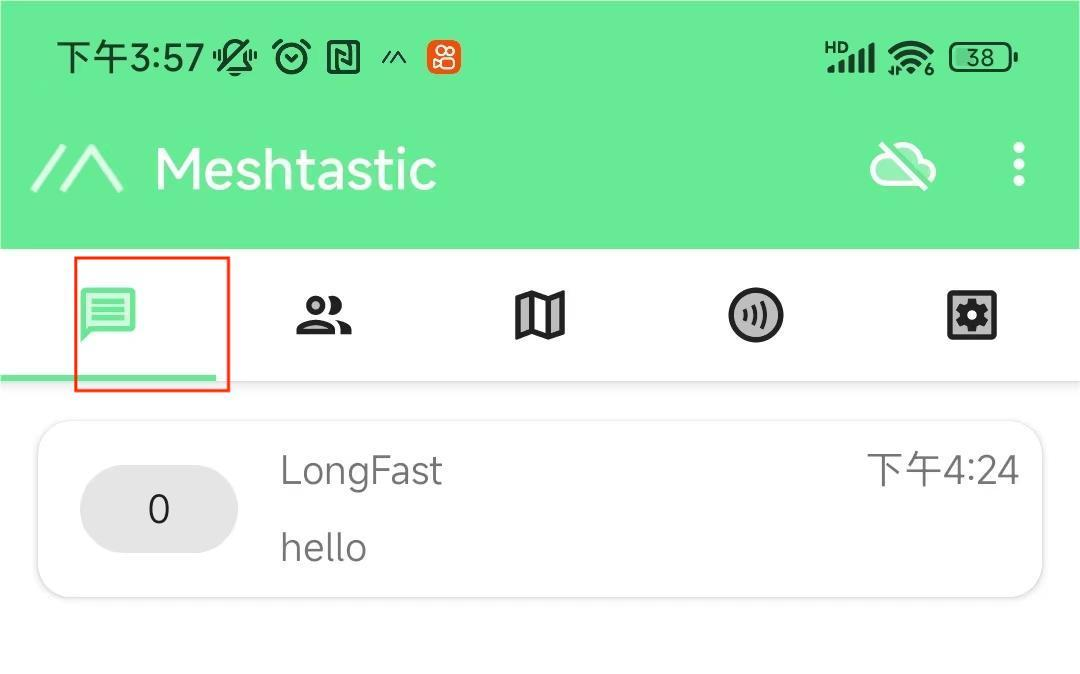
-
Here you can view the messages you wish to send and receive, which will appear on your device's screen.
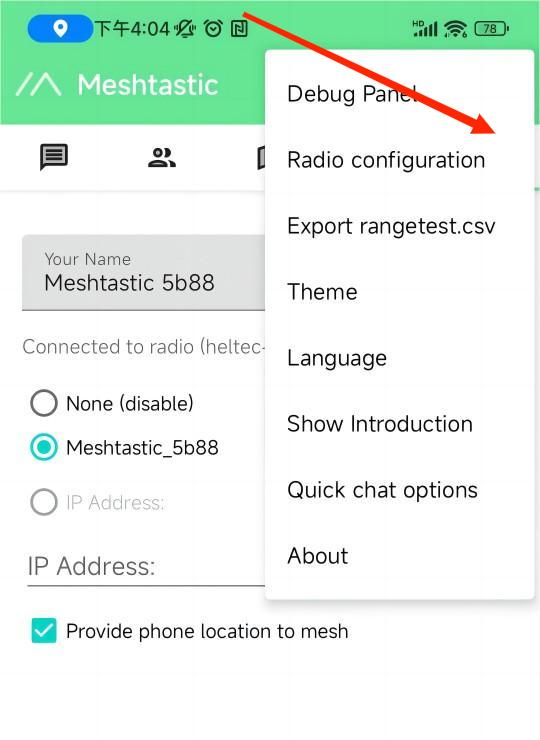
Further settings and usage instructions
Click the button in the top-right corner to view more configurable options.
6. Docs & Guides
6.1 Official firmware
-
Meshtastic Official Firmware (Source Code + Pre-compiled)
-
Main firmware(LoRa Node)
-
Wi-Fi / BLE Support Branch (e.g. using Meshtastic + Wi-Fi)
-
Download path: Meshtastic GitHub (example)
-
6.2 Build and flash
-
Build tool:PlatformIO / Arduino IDE / ESP-IDF
-
Programming method:
-
Upload directly using
esptool.pyor PlatformIO -
Entering Bootloader mode facilitates the flashing process.
-
6.3 Sample Project
-
Basic LoRa Messaging
-
Wi-Fi HTTP / BLE Compatible
-
Solar power & battery monitor demo
8. 📺 Videos & Media
🎥 Equipment Testing and Demonstration
https://www.youtube.com/watch?v=hnwilTdHmaM
https://www.youtube.com/watch?v=0W15kurpOd8&t=608s
9. FAQ
Q1. Which development environments are supported? A:Supports common ESP32 development tools such as the Arduino IDE, PlatformIO, and ESP-IDF.
Q2. How to optimise LoRa transmission parameters?
A:Configure Meshtastic settings according to statutory frequency band allocations, SF (spread factor) and Bandwidth.
Q3. How to use GNSS?
A:Connect the GNSS module via the SH1.25-8Pin interface and utilise the corresponding firmware for expansion.
Q4. 2.4GHz antenna
A:The default 2.4G FPC antenna is located on the side of the plastic screen bracket.
If you wish to use the 2.4G antenna connected via IPEX, you must remove the inductor marked as ① in the diagram below and add a 0-ohm resistor (or other conductive metal or cable) at the position marked as ② to connect to the IPEX interface.
Q5. My screw looks a bit odd?
A:This area incorporates a 2.4 GHz FPC antenna. To prevent compromising its performance, custom-made plastic screws have been employed here.
This is why they look different from ordinary screws. When disassembly is required, simply press down gently with a screwdriver and turn.
Q6. What type of battery socket is it?
A:You can find this type of socket by searching for "SH1.25 x 2".
Q7. Are Heltec V3 and V4 compatible?
A:They are compatible in most cases. As V4 utilises the same series of chips as V3, features identical OLED displays, and possesses virtually identical pin layouts, V3 and V4 units are interchangeable in most scenarios. However, due to increased transmission power, the transmission power settings within certain code may no longer correspond directly to the actual output.
Q8. Code upload failed
A:Please try the following steps:
-
Please try using a different USB cable.
-
Enter bootloader mode. There are two methods to enter this mode.:
- Press and hold the PRG button, connect the USB-C cable, then release the PRG button.
- Connect the USB-C cable, press and hold the PRG button, press the RST button once, then release the PRG button.
Q9. Why are there no soldered resistors at the 868 and 915 markings? Which frequency band does my device actually support?
A:It indicates simultaneous support for both the 868 MHz and 915 MHz frequency bands. In the initial design, we developed two separate hardware versions to achieve optimal radio frequency performance. However, through subsequent debugging, we successfully unified the hardware for both the 868 MHz and 915 MHz bands while maintaining excellent radio frequency characteristics.

11. References
Compatible antenna
If you require assistance with Meshnology N39Replace the antenna,Click here👈 to obtain one.
If you require access toMeshnology N39Complete kit,Click here👈Obtain one.
Meshtastic Official Hardware Support List (Heltec LoRa32 V4) Meshtastic
Meshtastic Official GitHub (Firmware + Device Support)